
Wallpapering the Downstairs Bathroom (Part 4 in DB series)
This is the fourth post in a series on the building of our downstairs bathroom. You can find the other posts here:
Here is where we left off in the last post.
Before

(*This post may contain affiliate links. By purchasing anything from these links, I may receive a small commission at no cost to you. More information is available on my Disclosure page.)
The drywall was all finished, and the skim coats had been put on. Everything had been sanded down. Now for the fun part!!
Peel and Stick Wallpaper vs Real Wallpaper
When I realized that I would need to choose paint and/or a wall covering for our new downstairs bathroom, I was excited! For quite awhile I had been seeing a certain peel and stick wallpaper on Pinterest that I liked, but I didn’t think I had anywhere in my house to put it. And then it dawned on me that I could use it on one of the walls in our new bathroom! I ordered it in plenty of time, and it was a good thing I did. My excitement turned to disappointment when I saw that the colors didn’t match the Pinterest pictures. The colors weren’t even close.
After some internet searching, I found the wallpaper in the right color from somewhere else. In the picture below you can see the two different wallpapers side by side. The one on the bottom is the peel and stick wallpaper whose colors were darker, and nothing like that beautiful Pinterest picture. The one on the top is other one I found, in the right colors. (They are also laid out on their rolls in opposite ways.)

See the difference? I was sooo glad that I had found some other wallpaper in the same beautiful colors I had imagined — except that it wasn’t peel and stick removable wallpaper. It was Real Wallpaper.
Well, I liked it so much I decided to use the Real Wallpaper. I had done a real wallpaper border before in my girl’s bedroom, so I already had Zinsser Wallpaper Primer* and didn’t need to buy more. The bathroom wall was small, and this is the process I did from Before to After!
The Process
First I had to paint the entire interior of the bathroom with Drywall Primer. It was new drywall, remember. Here is the shelf area with the Drywall Primer coat.

Then I painted all the walls except the accent wallpaper wall with 2 coats of a really light green that I custom mixed using Ace Hardware’s Spring Dew (from a previous dining room) and a white– both of which I already had– so I didn’t have to buy any paint. This picture shows the green wall, opposite the wall that I was going to wallpaper. This light green is in the wallpaper, in just a slightly more saturated hue.

Wallpaper Primer is Absolutely Necessary!
So for the wallpapering, the first step was to use the Zinsser Wallpaper Primer* (pictured below) and let it dry. I discovered wallpaper primer just before I did the wallpaper border in my daughter’s room. It makes hanging the wallpaper so easy! It gives just the right amount of grip and slip so you can adjust the wallpaper as you need to, but it won’t slide off as it dries. It also claims to make removing the wallpaper easier. Hopefully it will be quite a few years before I need to post about that!

Here is the wall with the wallpaper primer on it. This wall is where the sink, mirror, toilet, and cabinet will all be. It was really nice to be able to wallpaper the wall first, before all those things were installed. Otherwise, it would have been a huge pain to wallpaper this particular wall.

Decide on the Layout Before you get the Wallpaper Wet
I taped the wallpaper up different ways to decide which way I wanted the “boards” to go. I also laid out the flooring at the same time, to decide which way those vinyl boards would go. You see, in the designing process I had decided on lots of lines– lines in the vinyl flooring planks, lines in the wallpaper, and beadboard lines in the ceiling (posts on those to come!) And after looking at it taped on the wall, we decided to have all the lines going in the same direction (not the way it’s pictured below).

Use a Level
I taped the dry wallpaper to the wall and cut around the water pipes. I also used a 3 foot long level to be sure my “boards” were going to hang straight. I already mentioned how nice it was to hang the wallpaper before all the fixtures were installed. It was also really nice to be able to hang it before the door molding (to the left) and the floor baseboard moldings were installed. It made the process of hanging wallpaper a lot easier on this particular wall.

Apply it to the Wall
I folded the wallpaper in an accordion/ fan pattern, and then immersed the it in the laundry sink half full of cold water for the required 5 seconds, and hung it. I pressed out all the excess water and air bubbles with a big cloth. Then I taped up the next dry length to measure it. Then I did it all over again– the immersing in cold water, applying the wallpaper to the wall, and getting out the excess water and air bubbles. Repeat four times up the wall.

And here it is with 3 lengths applied. Like I said, the wallpaper primer really does a fantastic job of holding the wallpaper in place while still allowing you to adjust it– not too slippery, but not too much grip either. I did these lengths without any assistance.


Covering the light switch and outlet covers
The hardest part of the whole wallpapering process? Wallpapering the light switch cover and the outlet cover. They were right on a seam– so two halves were needed for each piece to match the wallpaper pattern. The primer was very necessary for this process, and even then it was difficult to get the wallpaper to stick because of the rounded edges of the covers. So I used some packing tape (which I later removed) and Mod Podge to hold the wallpaper around to the backs of the covers. It was worth all the time and effort because it really turned out nice, don’t you think?!


AFTER

AFTER!!

Later on, I decided to use some of the leftover wallpaper to cover the toilet lid. You can find that post here. Next in this series– the flooring!
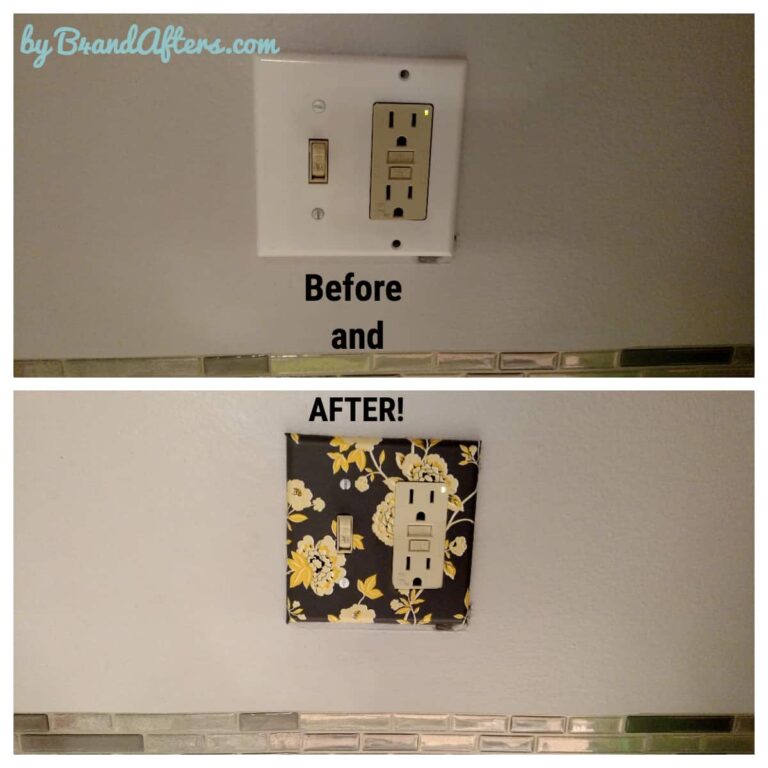
I love your wallpaper and how you hid the light plates! Bet you are happy to have that done, so pretty!
Oh yes, I was glad to have it done, too! Thanks– I’m glad you liked it!