
Landscaping the Right Side with a Dry Riverbed
One of my favorite outdoor before and afters projects was when I decided to landscape a rock path through this corner garden area. I think a rock path can also be called a dry riverbed– have you ever heard it called that? Read on to see how to landscape a rock path — complete with a border and stepping stones.
When we bought our house, this side of the house had just a little mulch. It was lower than the rest of the front yard, beginning to slope down to the back yard. Inside, the basement wall here seemed like it could have moisture trying to get through sometimes. Somebody suggested that filling in this area with more dirt would give more of something for rain to soak into before it tried to get through the wall. So partially to help with that problem, and partially to make that side of the house look nicer, I got to work.
First, I put down a lot of free used goat straw.
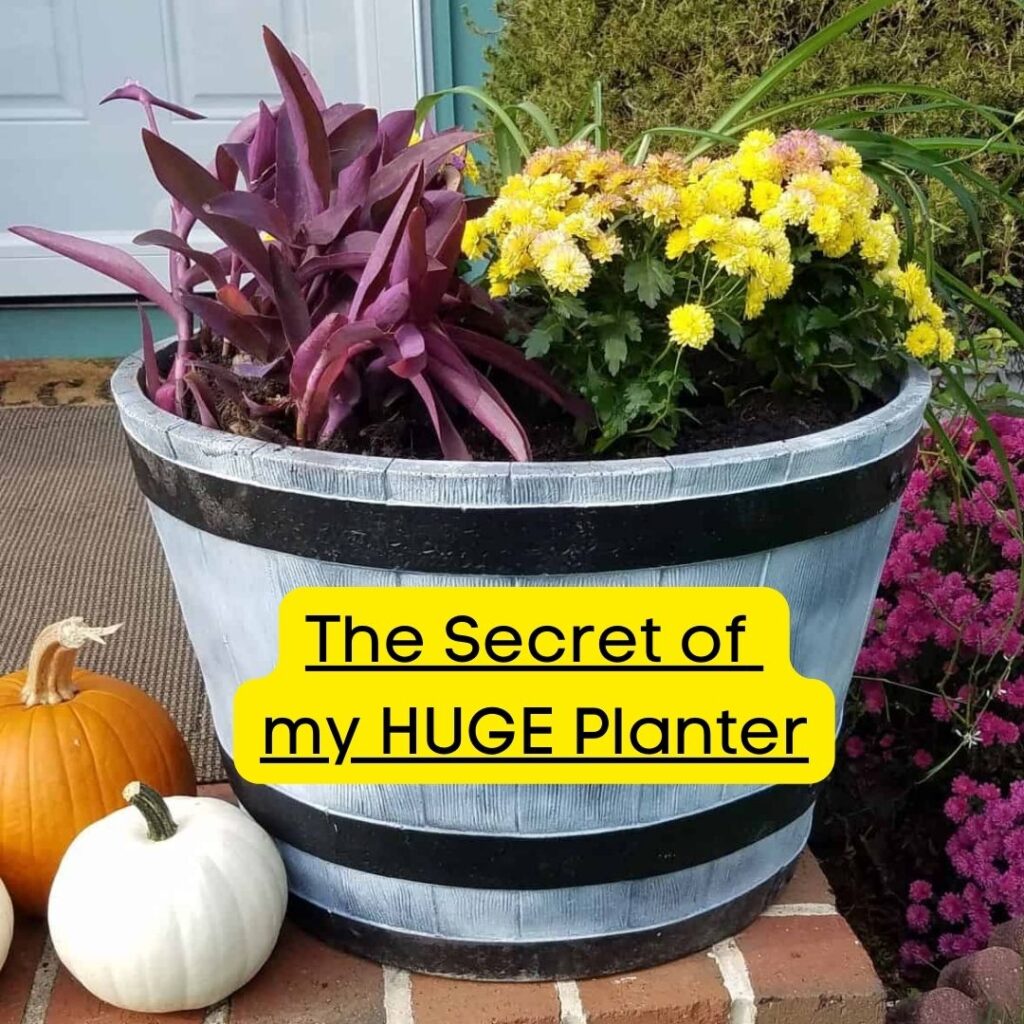
My Planter has a secret….. of how it manages to stay lightweight!!!!
In a nutshell, here the steps you can take to build a dry riverbed/ landscape a rock path.
- Add dirt if necessary. We used garden soil on top of straw.
- Set plants where you want them, before you actually plant them so you can move them later if you want.
- Decide what type of border to use: plastic edging, short wood fencing, brick, etc. Install it.
- Lay down heavy duty plastic.
- Lay stepping stones down.
- Spread rocks– I used bagged “white marble chip landscape rock” from Home Depot.
- Add a bench or other decorative garden items.

Then we had a truck load of garden soil delivered. Some of the dirt I took to the garden, some I put in the front flower beds, and the rest I left right here.

We probably raised the level of the dirt a good 18 inches. For awhile I wasn’t sure what to do with this odd triangle. It gets morning sun, but then is in shade after 12 p.m. I planted broccoli and turnips later one summer since they tolerate cooler temperatures.

After we got our new fence put in, I began to do some more definite things little by little. First, I planted a free rose bush (from an online gardening purchase survey program that I participated in) in the corner. I planted cannas from seed, and hostas that I split from a giant hosta in my back yard, along the side of the house.

I had made cement stepping stones (with a little help mixing the concrete part) with my kids’ handprints and footprints.

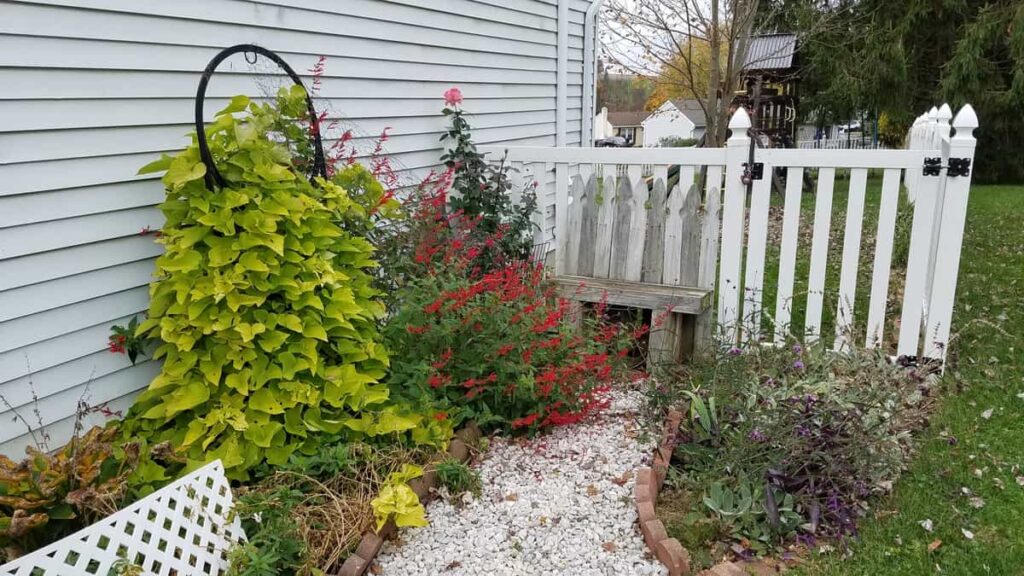
I needed a place to put them, and decided that a dry river bed of sorts would be the place for them to set. It would define a path to the gate through the garden bed.
Previously, I had used some free bricks from Craigslist to divide the dirt from the grass. I put down plastic from bags that I had saved from wood pellets. I just cut the bags open to lay flat. Then, I used cedar wood edging (I may soon replace that with some scalloped brick edging that I have acquired) along the sides of my dry river bed. I used white rocks on top of the plastic to fill in around the stepping stones.
How to Landscape a Rock Path

Since this part of the house is in shade during the hottest part of the day, it is fun to come here to garden then where it is cooler.

The dry riverbed defines a path to and through the gate, and keeps people from trampling on the plants. I’m so happy with how it turned out! It’s such a peaceful area. Later on I got some scalloped brick edging and replaced the wooden edging with more brick.

This picture shows how my volunteer yellow pear tomato plants grew like weeds.

My rose bush has thrived in its corner. In front of it are some tall verbena, with tiny purple flowers when it blooms. I take the stepping stones inside during the winter, just in case freezing weather would damage them. You can see how the path curves to the right, past the bench to go through the gate. By the way, if you like that bench, I made directions for you!

My cannas came back after the winter, since they are somewhat protected by the house. The columbines that I recently added are coming back, as well as the bleeding hearts. I also have some very hardy soapwort that comes back every year that is more toward the front. In addition I have lots of yellow pear tomatoes that spring forth by the hundreds of plants every year. They have already sprouted. If you are local and would like some yellow pear tomato plants, please let me know in the comments. I would love to give you some. In the little circle to the right of the stepping stones are lamb’s ear and money plant. It is really amazing what you can fit in a small space– especially when you are trying to leave no room for weeds to grow!.

It is very enjoyable to walk through this space on my way to the back yard. I don’t often sit on the bench, but I should. This is one of my favorite garden spaces.
SaveSave


Great space. Looks like it’s mostly shady? What zone are you in?
Hi Karen,
I am in Zone 6. That area faces east, so it gets morning sun and then is in shade during the hottest part of the day and the evening.
wow, what an improvement from the before! i love the brick pavers and the way you used them to create the border.
b
Thank you!