
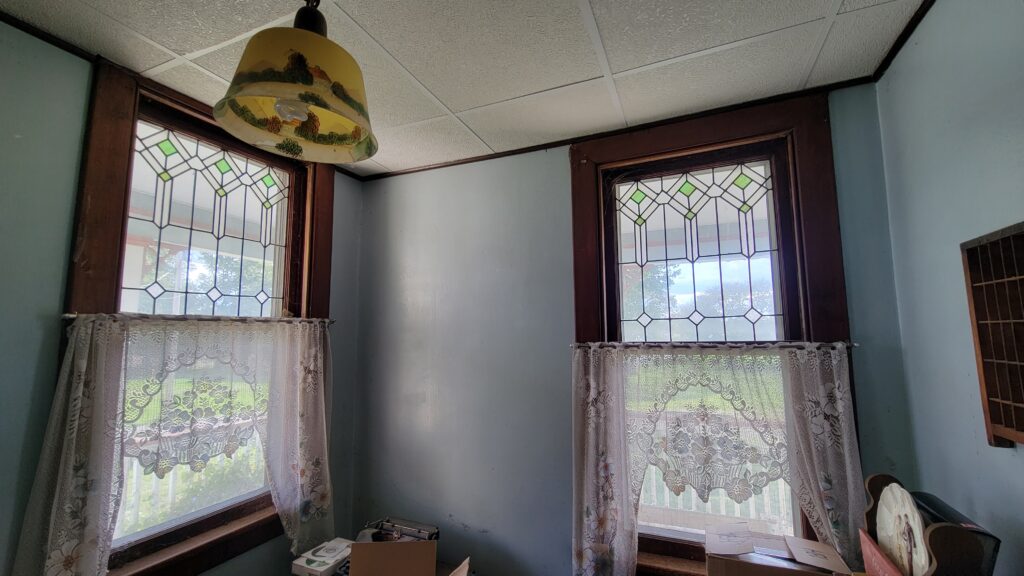
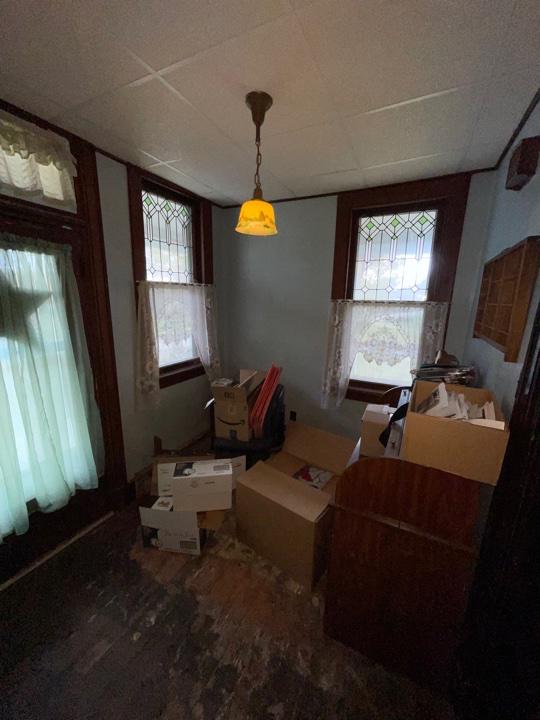
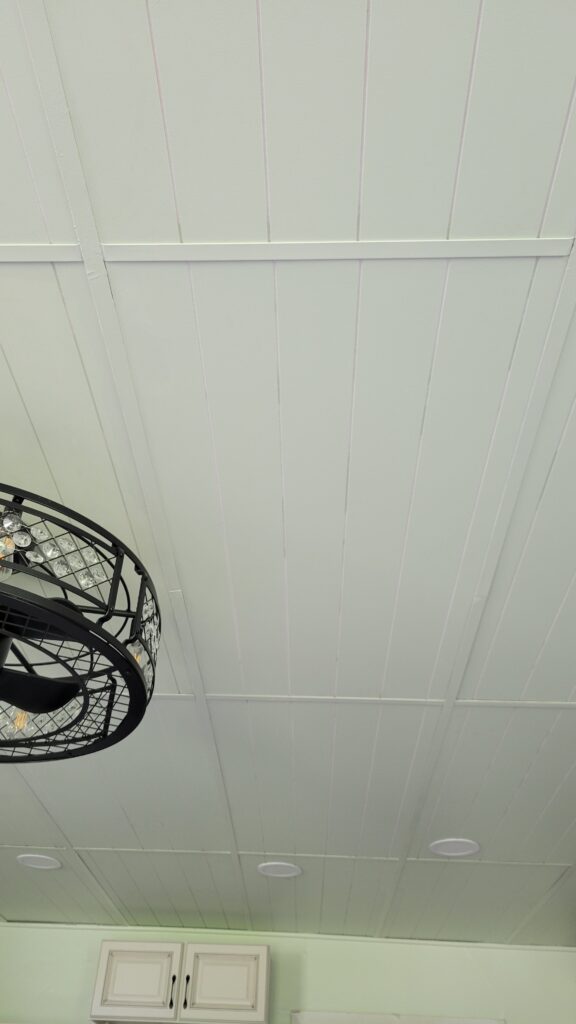
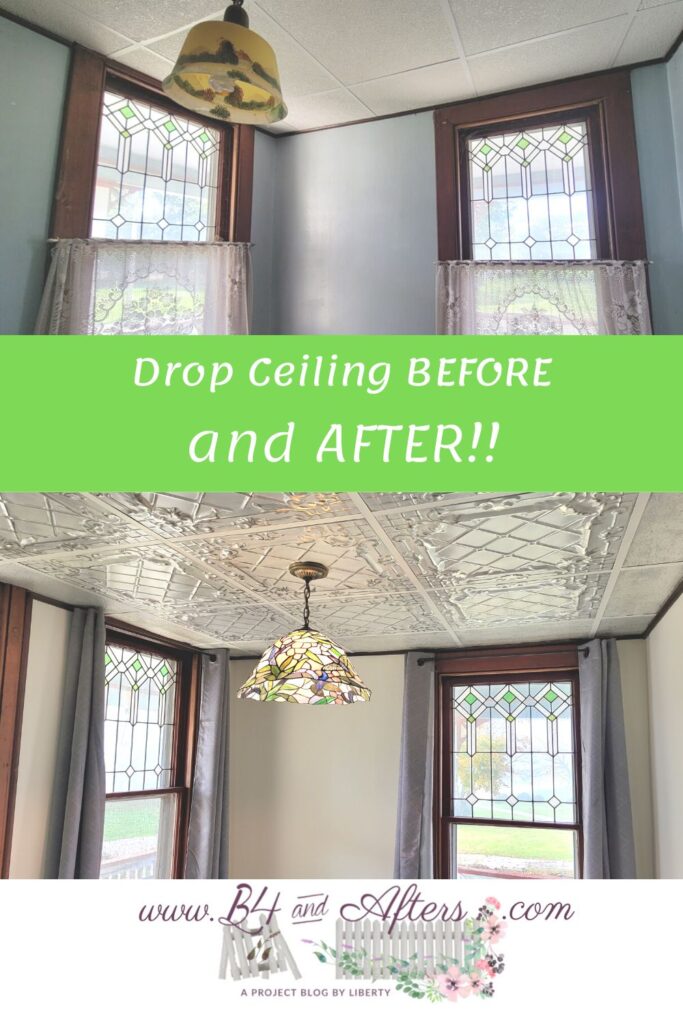
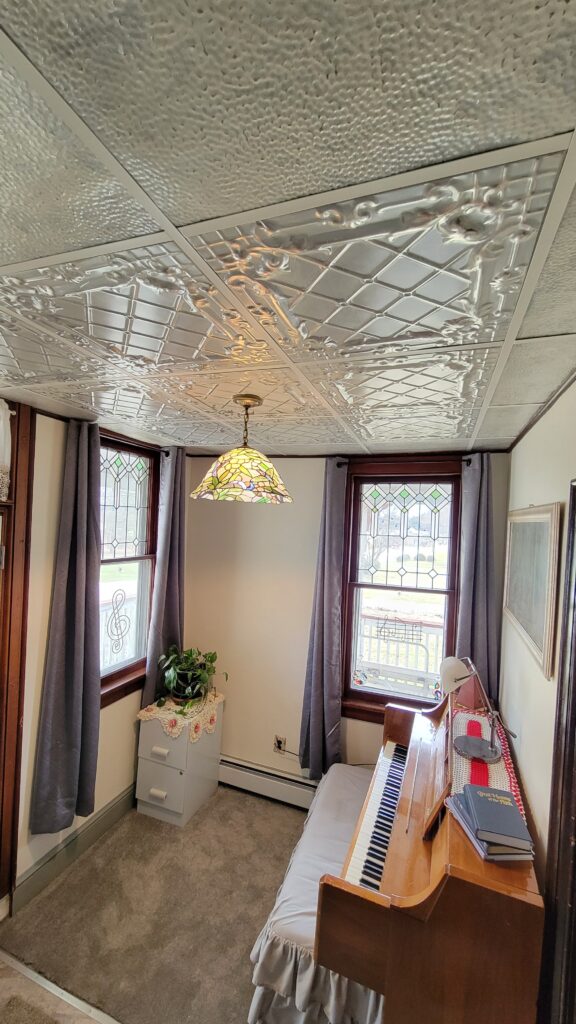
Piano Room Ceiling Before and After
We bought an old farmhouse with a bunch of drop ceilings. Sadly, we had to keep them due to all of the wires running everywhere– it’s just too expensive to change to a regular ceiling. Besides, the ceilings are high enough anyway already. Read on to see one of my best creative drop ceiling ideas, of how to make a drop ceiling look good!

*This post is sponsored by Black Dog Salvage Furniture Paint and in part by American Tin Ceilings. All opinions are my own. (And I have a lot of them!) I am absolutely thrilled that BOTH of these products are completely Made in the USA!

Not Sure How to Find a Nice Drop Ceiling Idea?
So How Do You Make an ugly Drop Ceiling Look Good?
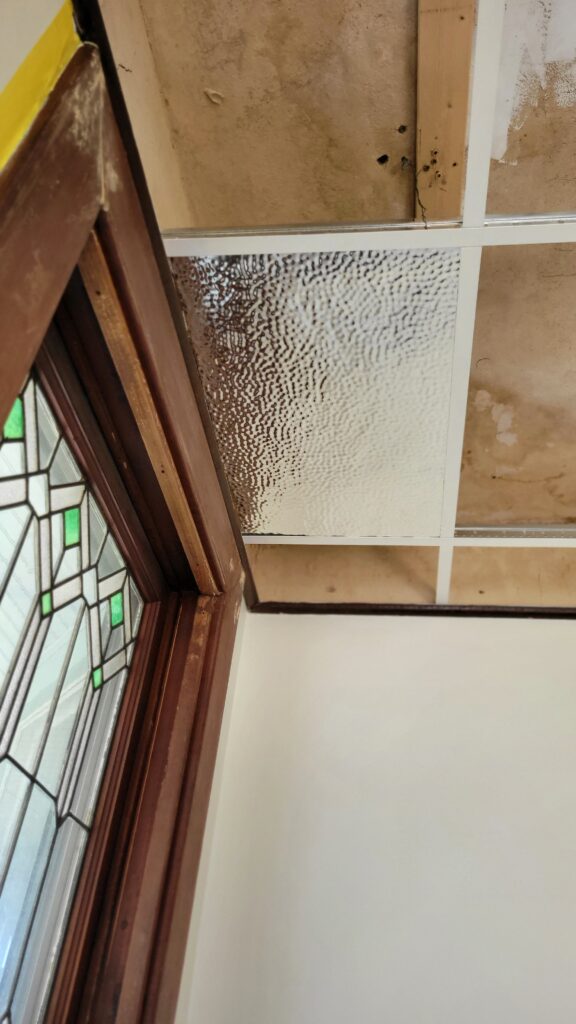
That’s what I wanted to know! So I started looking at my options. I knew I didn’t want to keep the awful tiles that were there– mostly because they were full of mouse droppings and so disgusting!! I didn’t want my house to look like an office or a basement. What could I do?
[See a video of what this room and the whole first floor looked like the day we bought the house.]
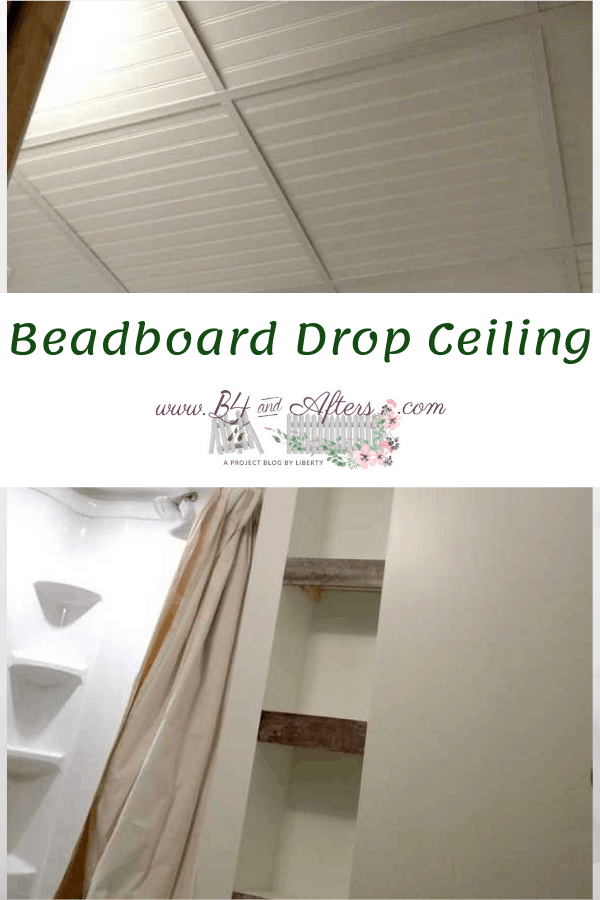
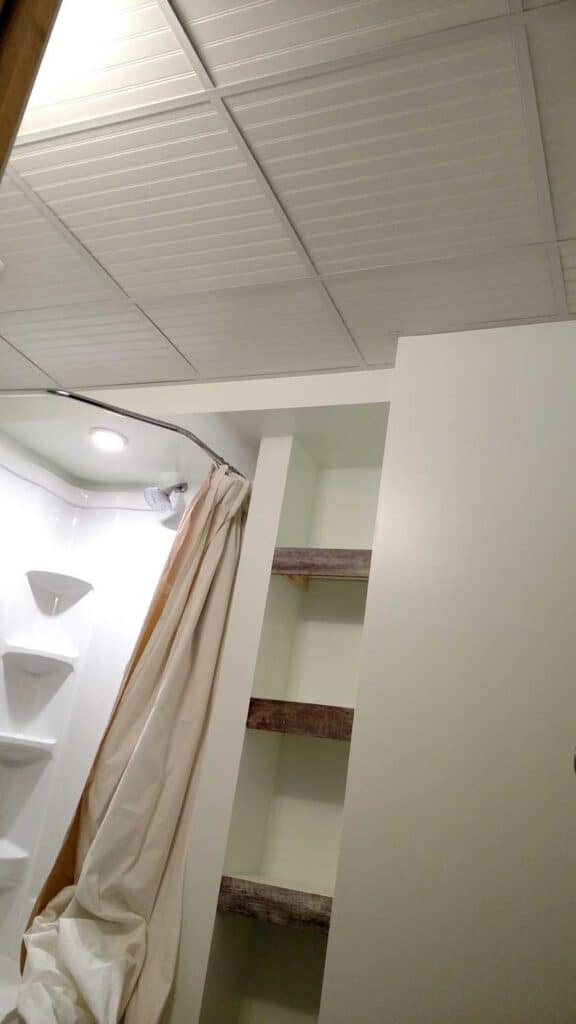
In the past I had done a beadboard panel ceiling. It looked great in our basement bathroom, but when we put it all over our basement– that was a lot of stripes! So for our daughter’s room we used a shiplap panel, with wider stripes.
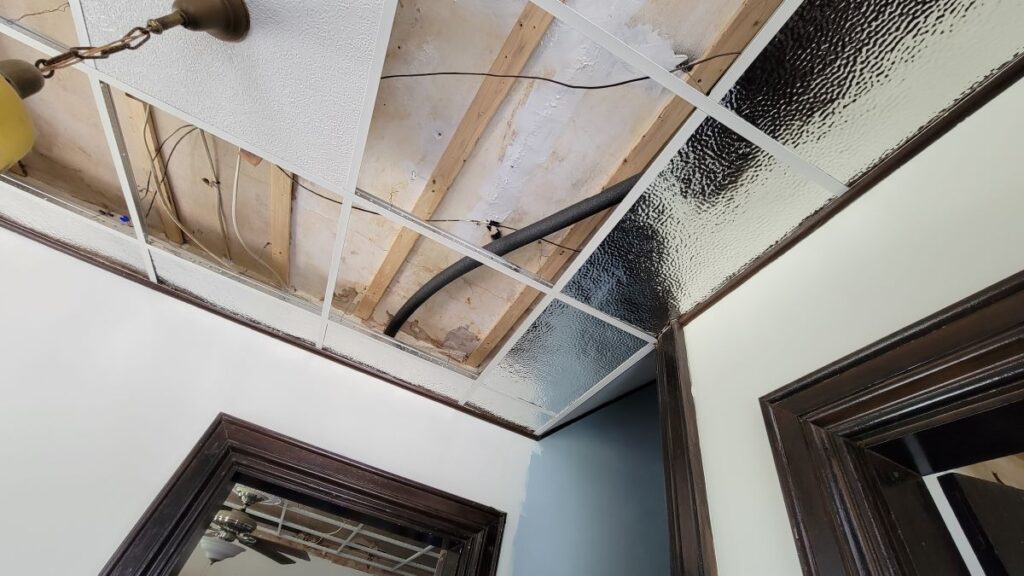
In my craft room we attached Woodhaven panels to the ceiling. But once you do that, you can’t access up into the ceiling, and my husband wants to be able to access the ceilings in our other rooms.
You might be wondering if there is anything you can use instead of a drop ceiling. What if I told you that you could keep that drop ceiling and make it look…. nice?
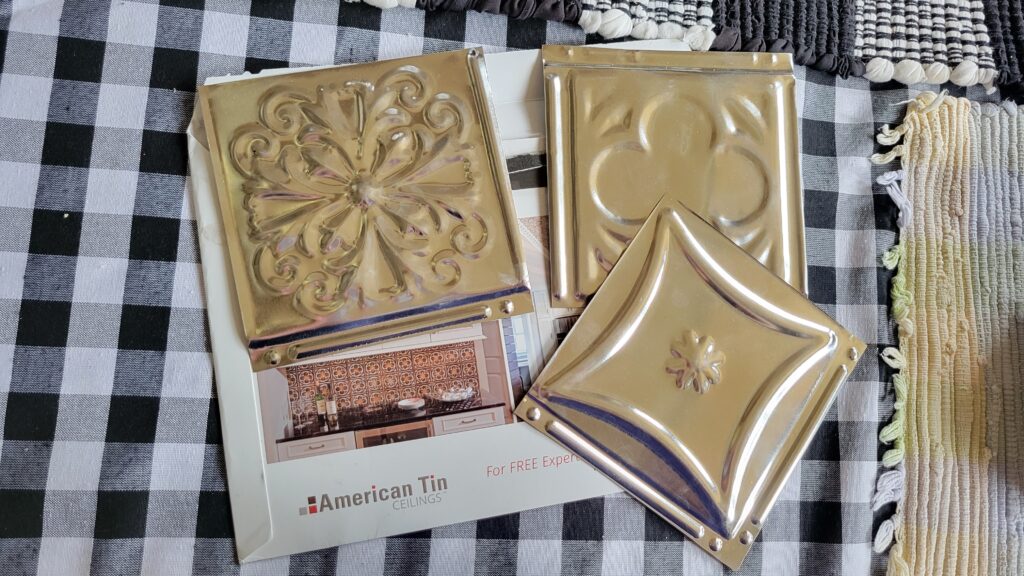
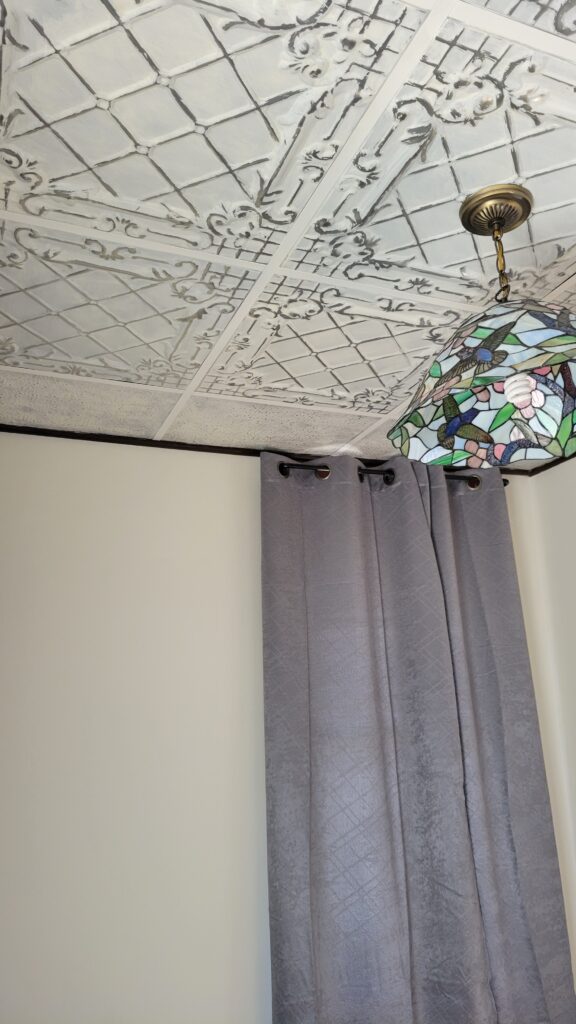
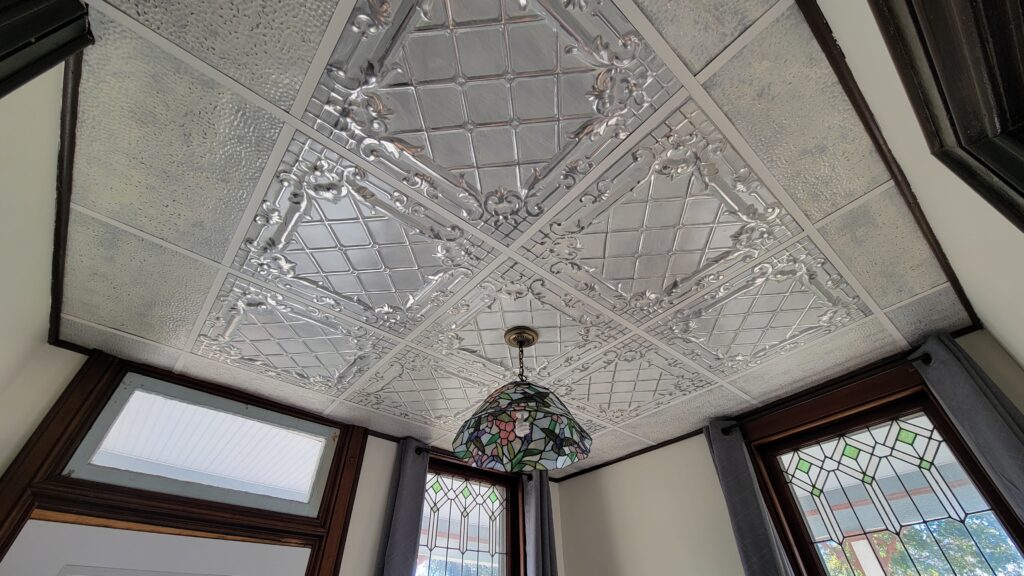
I wanted something pretty, something special. And then I found it. I found American Tin Ceilings. Oh, what beautiful patterns they have! It was hard to choose which one to use! I tried to keep in mind the other design elements in my room– the pattern of the stained glass windows– the light fixture, etc.
But something did keep me from ordering right away. The price. For a 2 foot by 2 foot panel, they start at $15 each, and for their artisan look, they start at $40 a panel. Start, mind you. They can be as much as $55 each panel!!! Whew!
Drop Ceiling Ideas
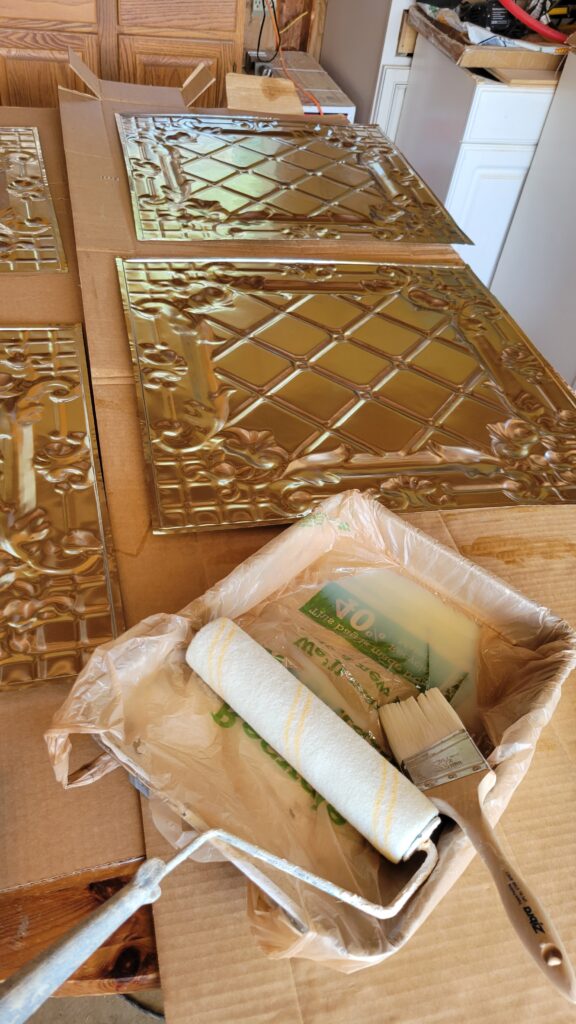
And then I saw that they have unfinished tin tiles for $8 each. Now that was a price that I could afford! And then they were kind enough to give me an additional discount so that I could share their fantastic tiles with you, my readers! I decided to get them for 3 rooms in my house.
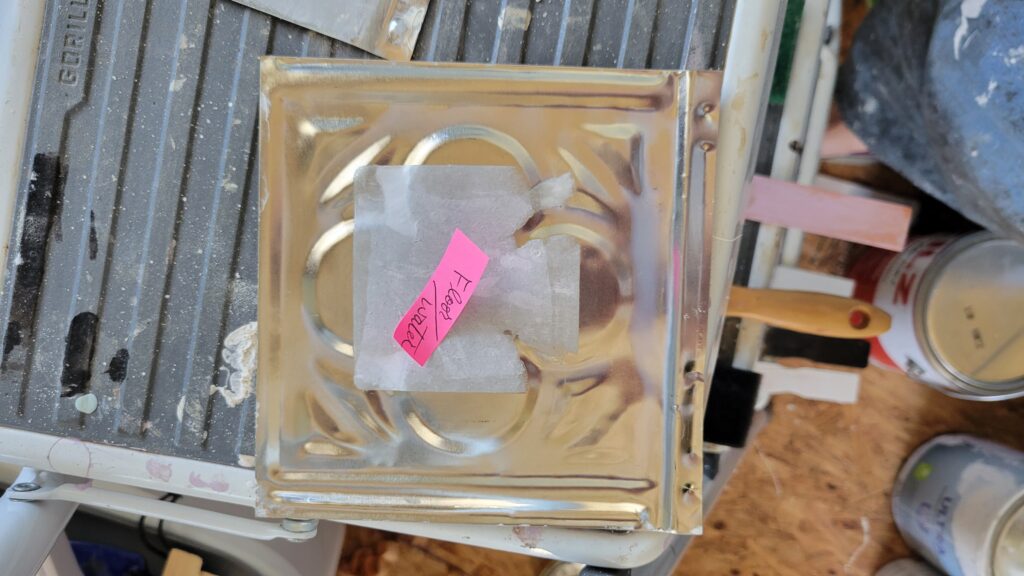
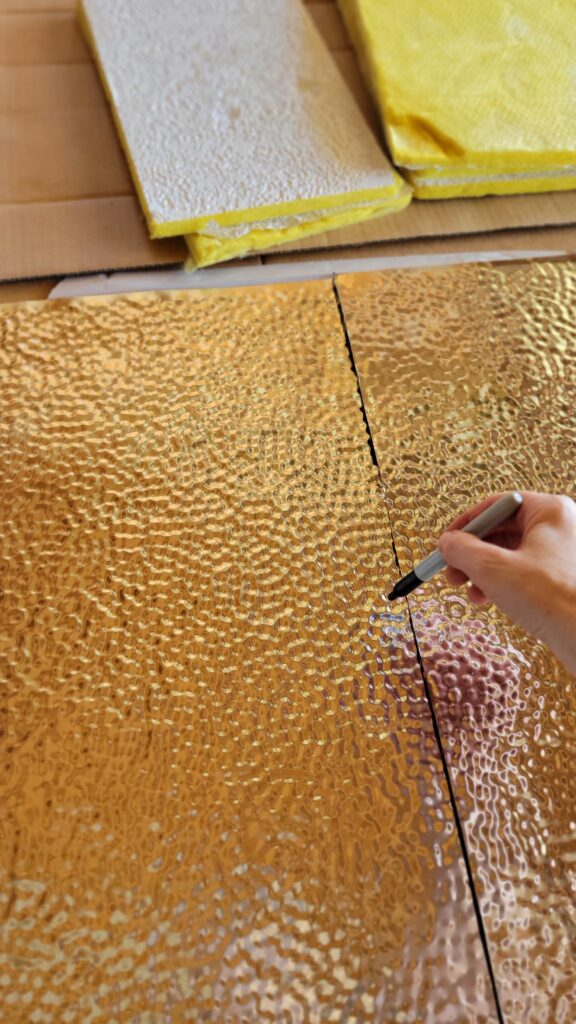
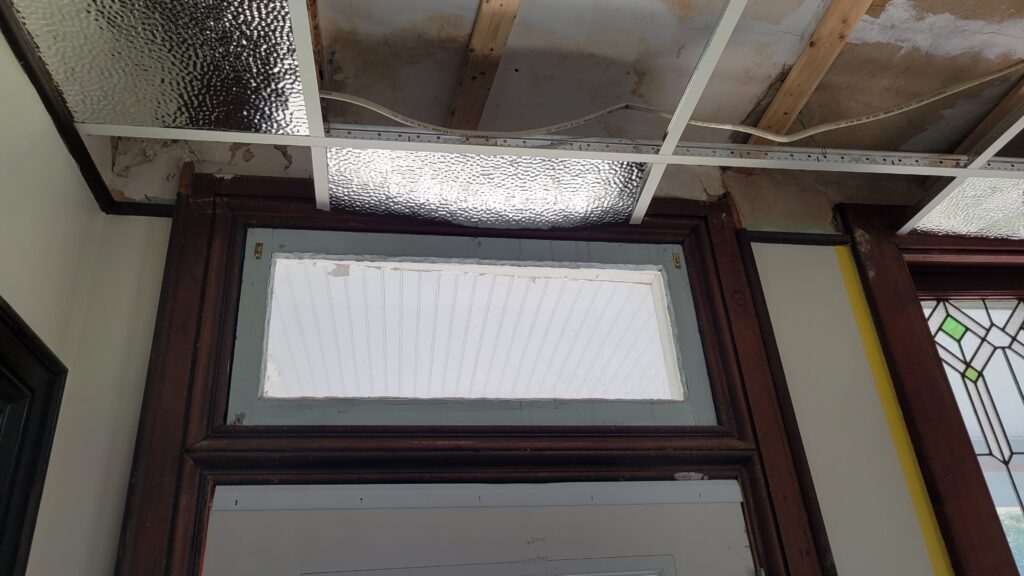
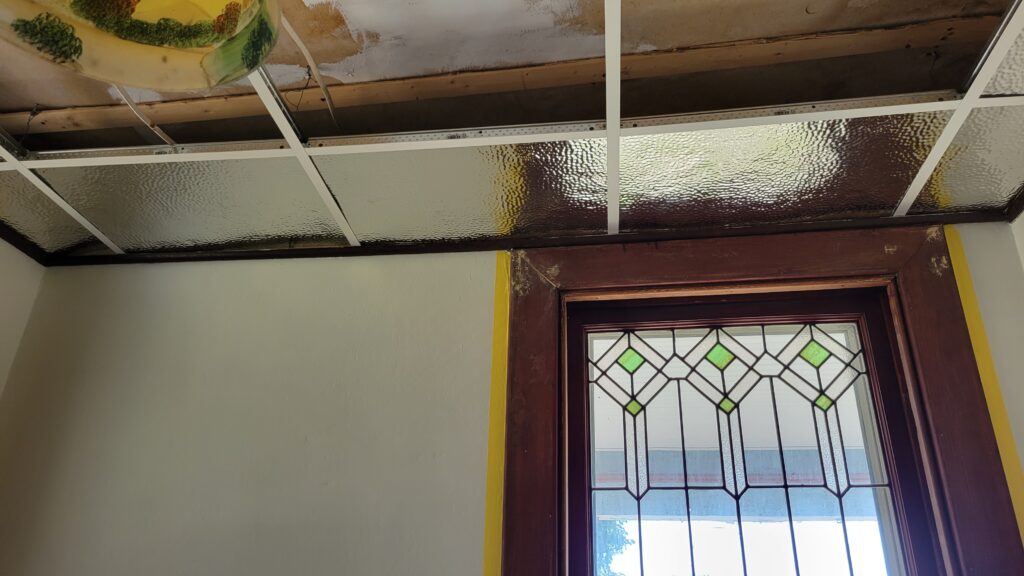
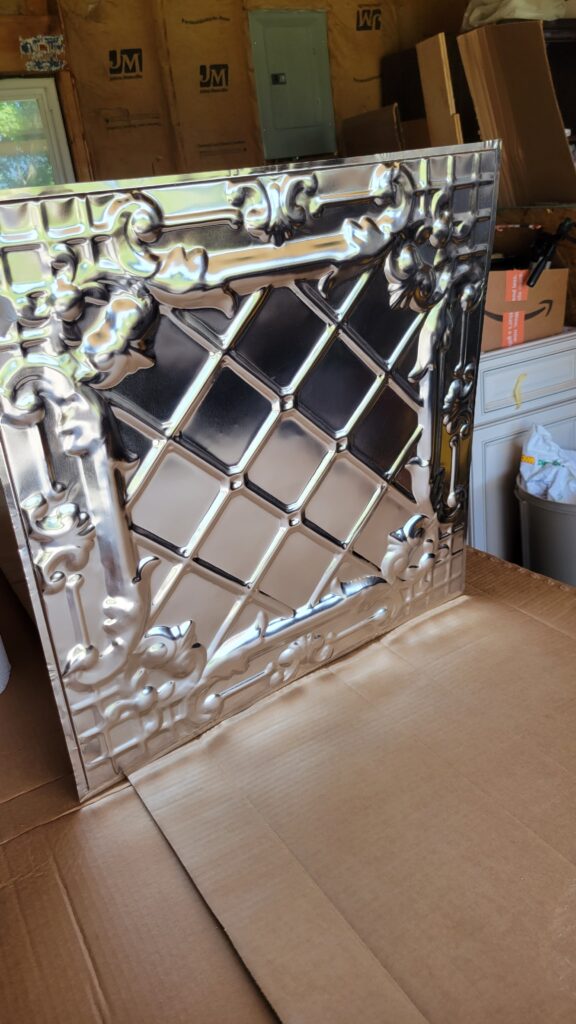
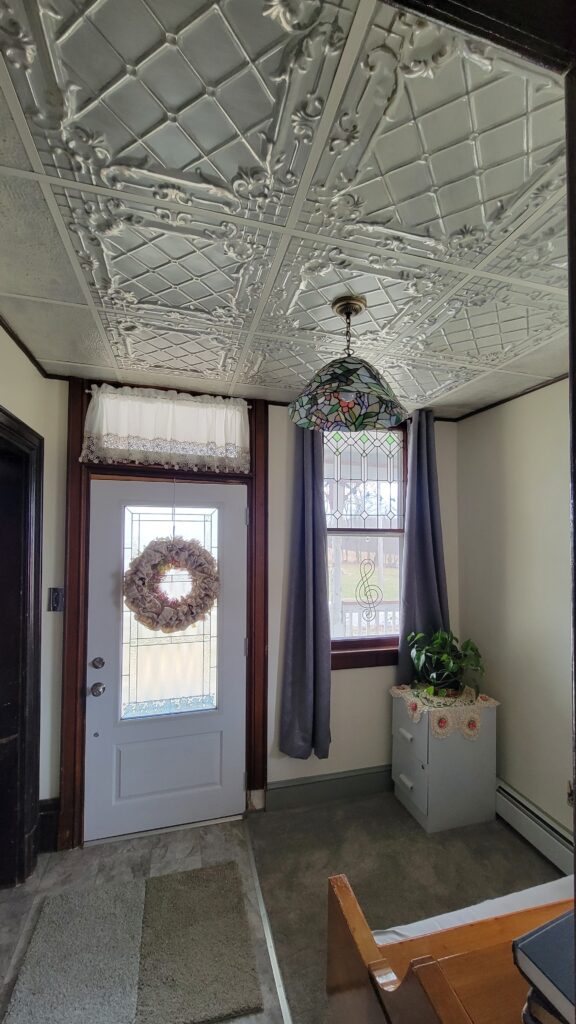
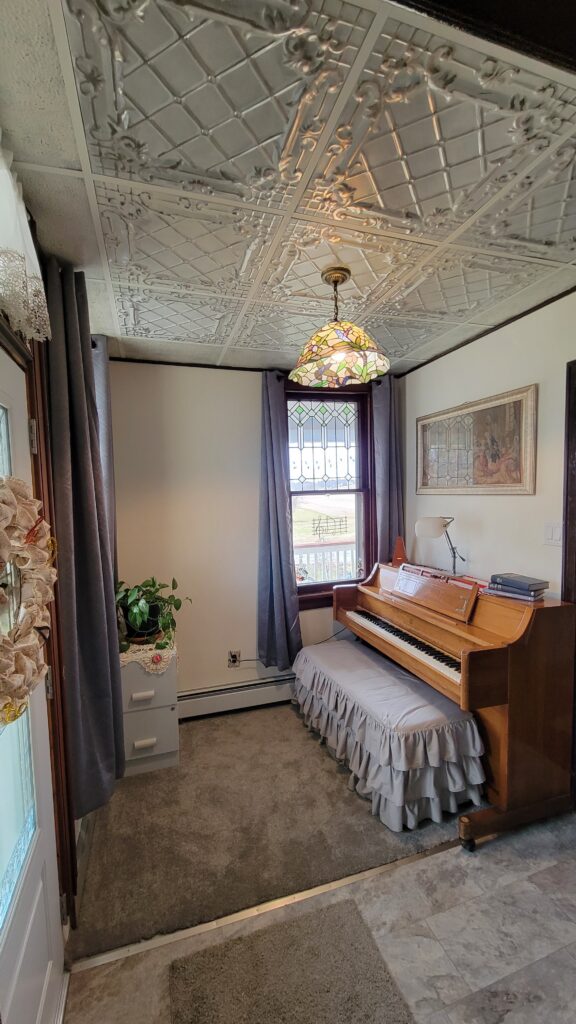
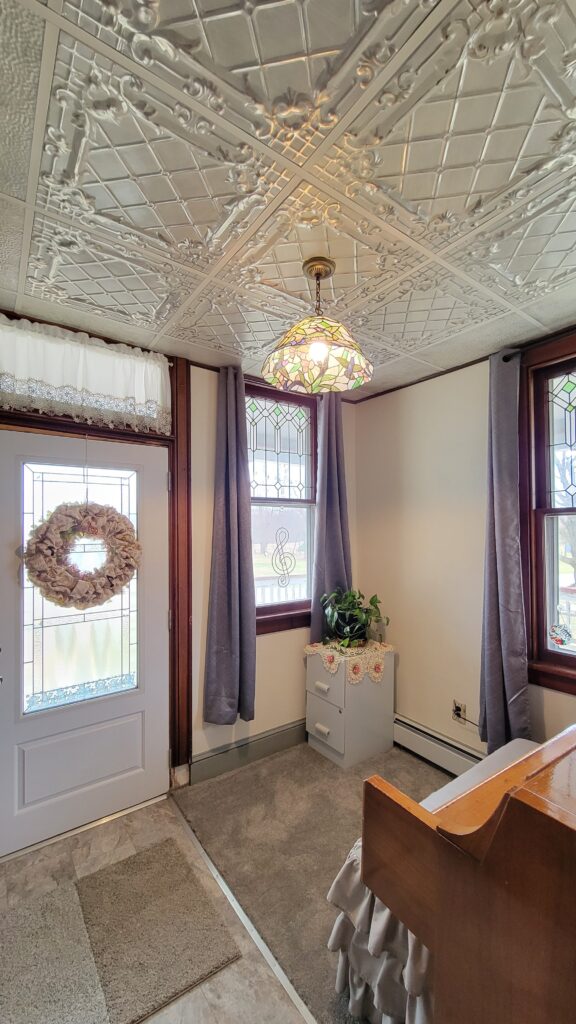
But this post is just about my piano room. For my piano room drop ceiling I chose Pattern #11. I felt that it would go well with the stained glass windows. I decided that I would use this pattern for the 9 full tiles that I needed, and I ordered what they call “filler tile” for the edges that bordered the 9 tiles.
How should I finish unfinished Tin Ceiling Tiles?
That was the next question I needed to answer. Thankfully, I knew who to ask. I had met Swooz from Black Dog Salvage a few months ago, and I knew that she had developed a paint that would stick to anything. Not only that, but it was water based for easy cleanup, and they had some great color choices. I believed that it might be perfect for my tiles.
So I sent an email and the answer was yes– she had painted some herself and it would work great! [Black Dog Salvage Furniture Paint ended up sponsoring the paint for my tiles. How great is that?!]
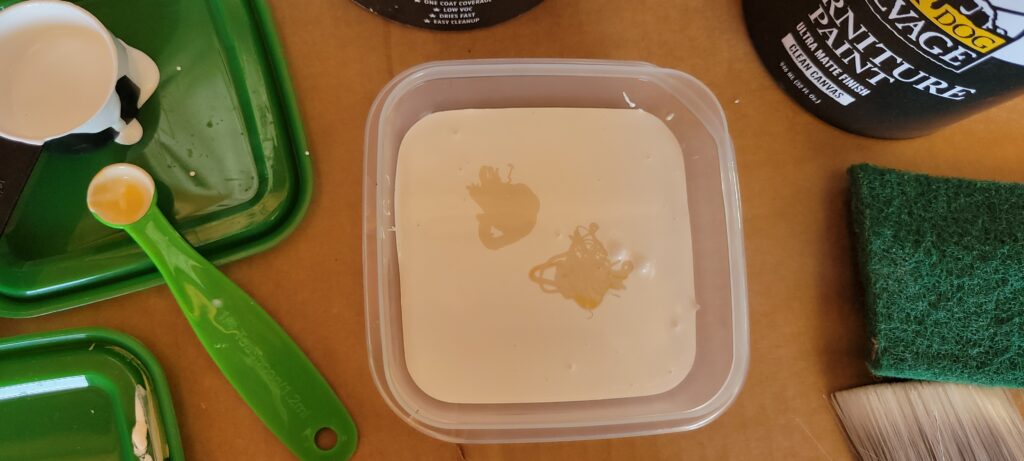
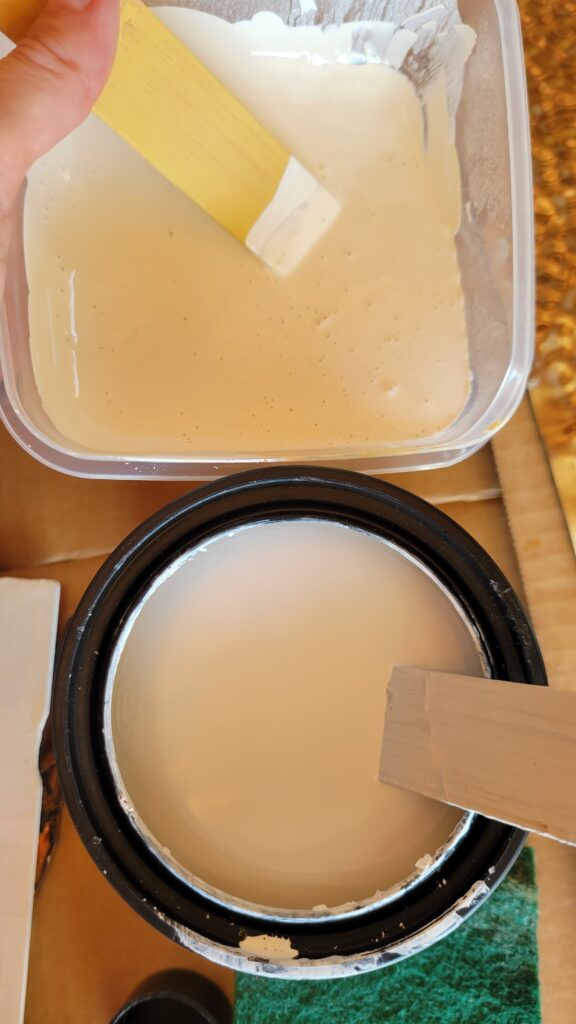
After both the paint and the sample tiles arrived, I set about to mix an ivory color to match my wall color. Would you believe me if I told you that I matched it perfectly on my first try??? Okay, well I almost did…. I used a lot of their Clean Canvas White, a dash of Dog Bone Khaki, and a dash of Baby I’m Amaized Yellow. I added more white, mixed it up, smeared a little on my wall and it was a perfect match!! (Be sure to use my code B420 to get 20% off!!!)
(If you want to match my Ivory formula it is 1.5 cups Clean Canvas, and 1 teaspoon each Dog Bone and Baby I’m Amaized.)
You know how some paints change color after they dry? Well, I painted the samples with my new color…. and after they dried I held them up to my wall. They still matched!! Also, if you’ve worked with chalk or milk paint that needs a sealer added to the top, you know that sometimes that can also change the color… alot. But when I added the clear coat to my samples– the color remained true. Wow! What more could I ask?!


How to DIY Your Own Painted Tin Ceiling Tiles
- Having the samples to test was very valuable. I highly recommend you get samples and practice on them first. That really made me confident that I could paint the big full sized tiles. The samples are very inexpensive. [And if you should decide NOT to diy, I still highly recommend you get color samples– they are very inexpensive and you just may change your mind as to which color you want after you see all of the beautiful choices!]
- Choose a good, high quality, easy-to-use paint like Black Dog Salvage Furniture Paint!
- Test, practice, test…. over and over, until you like it. Hold your sample up over your head like it is in your ceiling so you can vizualize what it will look like. You really want to make sure you like it before you do all of that work.
- Research– like you’re doing right now!
- Watch How-to videos.
How I Painted my own Tin Tiles for my Drop Ceiling
Okay, let me tell you what I did.
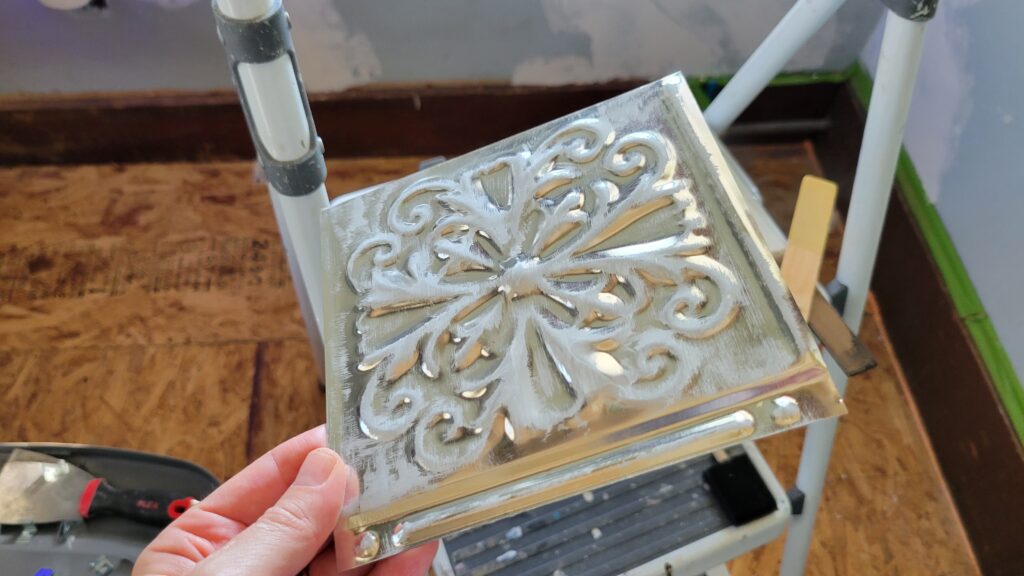
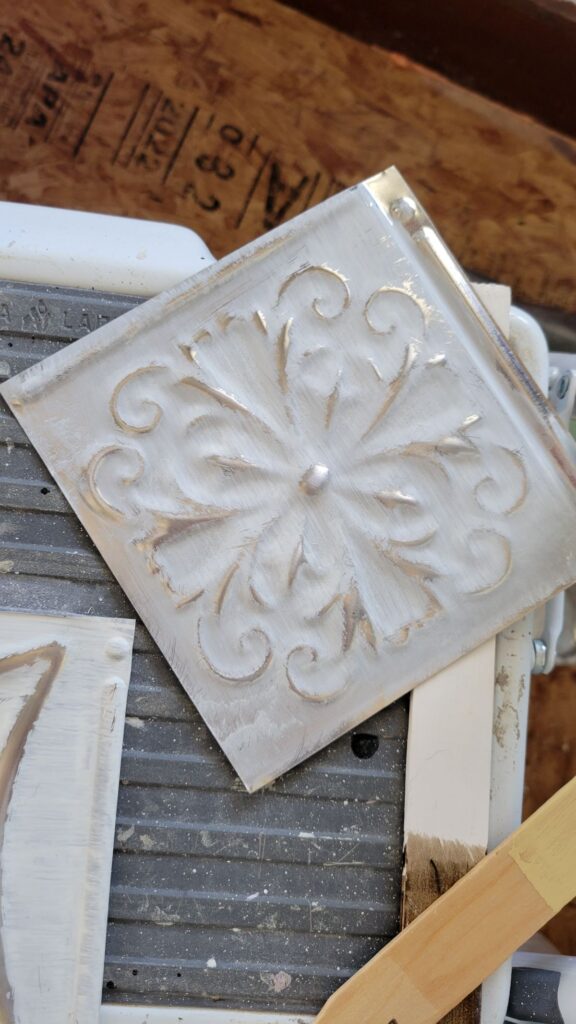
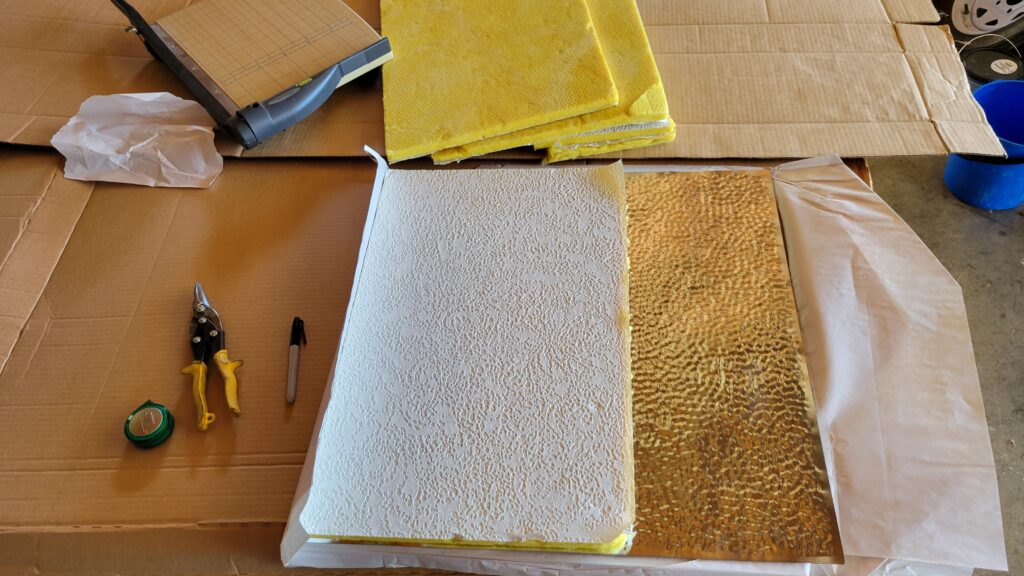
I tried different ways of painting– covering the entire tile with a “wash” (water added to minimize brush strokes), and sanding some of the paint off. I really liked the antiqued look and decided to use that in my piano room ceiling. The paint was easy to take off– in fact, because I hadn’t sealed it, I washed one tile completely clean.
My garage doesn’t have the best lighting, but hopefully you can see in the picture below my ivory mixed color, compared to the Clean Canvas white. The Clean Canvas photographed a lot darker than it truly is. It is a very bright white.
Once I had my color and paint style chosen, I needed to decide on a clear coat. Since my tin tiles were unfinished, they actually needed to be sealed on the back as well as the front. I already had some clear coats, so I tested them on the backs of my samples.
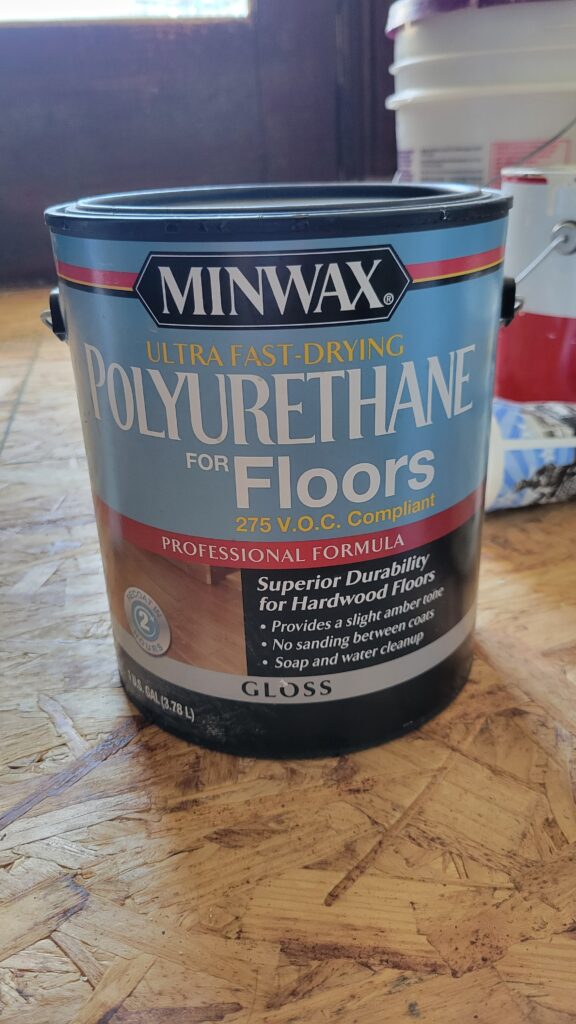
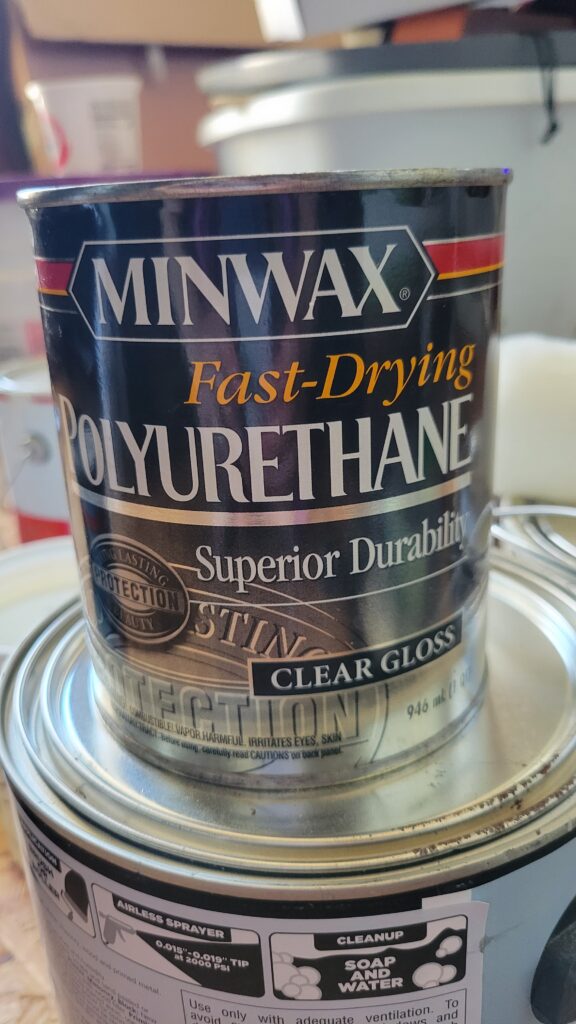

The oil polyeurathane was a very nice shiny finish. Oil based is what American Tin Ceilings (ATC) recommends. Either anything oil based, or one made for tin will work, according to Cynthia. Cynthia at ATC was very helpful and answered every single question I had– and I had alot!
On the top I knew I wanted to use Black Dog’s Show Dog clear satin top coat. It bubbled when wet– but when it dried those bubbles magically disappeared! And oh– what a smooth finish! I know that no one will be touching my ceilings, but you can look at something and see its smoothness without touching it.
I was finally ready to tackle those full sized panels. Just nine of them. I painted them, and sanded a few. I took a lot of video of the entire process, and my first full size tile didn’t turn out like I wanted. But I figured out that I needed to dip my brush in water to smooth out the brush strokes better.
Painting Steps for DIY Tin Ceiling Tiles with Black Dog Salvage Furniture Paint
So this is the process that I needed to do to each tile, that I did all at once to the whole group of them:
- Wash both sides with TSP to get any manufacturing residue off so the paint would be sure to stick.
- Dry with towel so water marks don’t remain. I used paper towels so then I had to brush the lint hairs off….
- Clear coat the backs with the Floor Polyeurathane and let them dry.
- Paint the fronts with a little extra water added to minimize brush strokes.
- Paint the fronts again the same way because the wash was thinner than I wanted.
- Sand off the high spots to get an antiqued look.
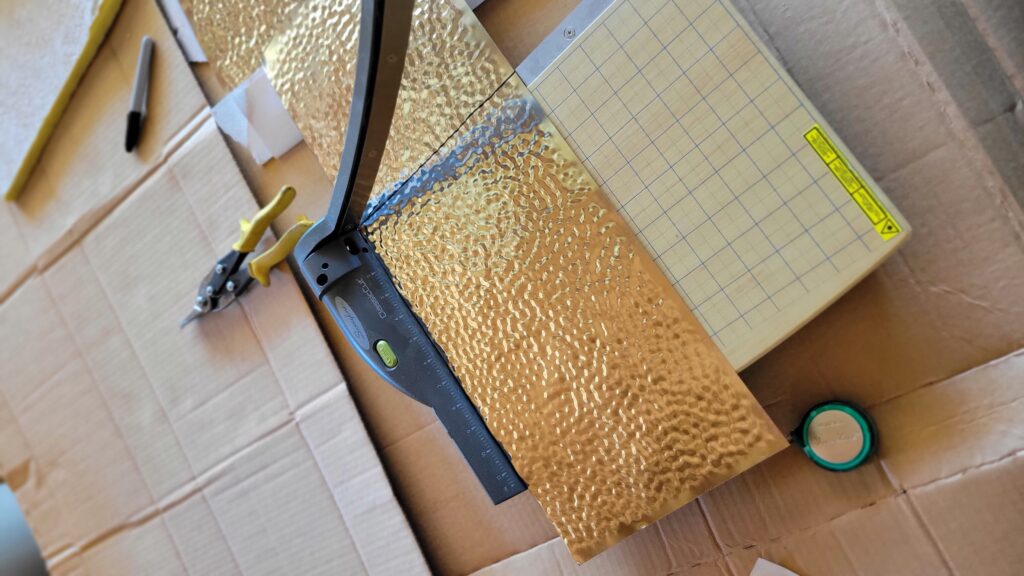
It took a lot of time! I also had to measure and cut the filler tile for the border pieces that were not full sized. I think that alone took me a whole day. I show in the video how I traced one of the old tiles and used a guillotine paper cutter and tin snips to cut them. I fit them all into the ceiling grid. Then I had to take them all out again to paint them.
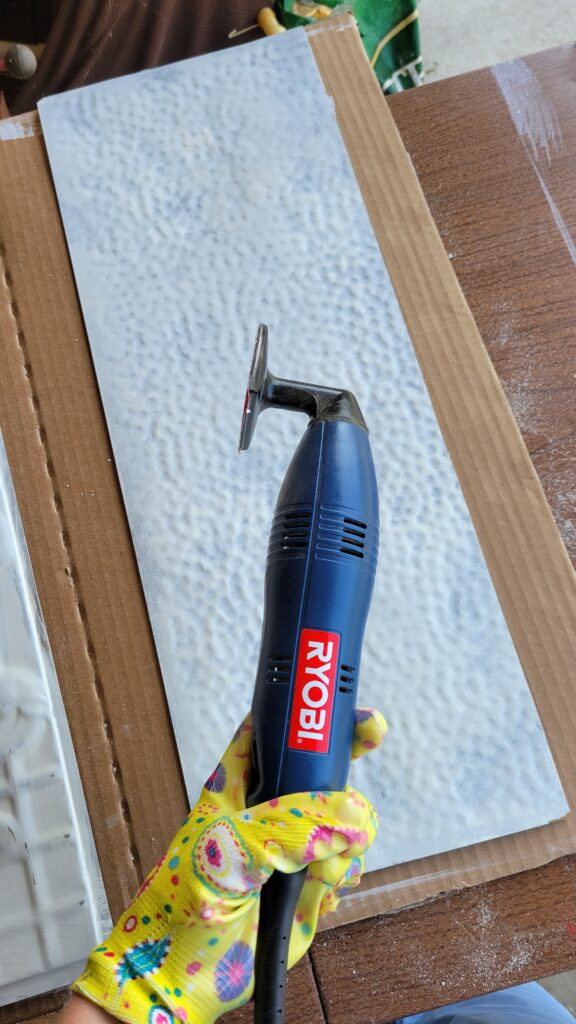
The oil from my hands would get on the tiles, so I used paper, like gloves, to handle them. Then I realized that I had some clean grippy work gloves and I began using them. They were very helpful and made things go alot faster.
**Safety Tip! Do be very careful and wear safety glasses when working with tin tiles above your head in a ceiling grid. The edges are all sharp– and those corners would very easily take an eye out if it slips from your hand while you are working it into the grid.
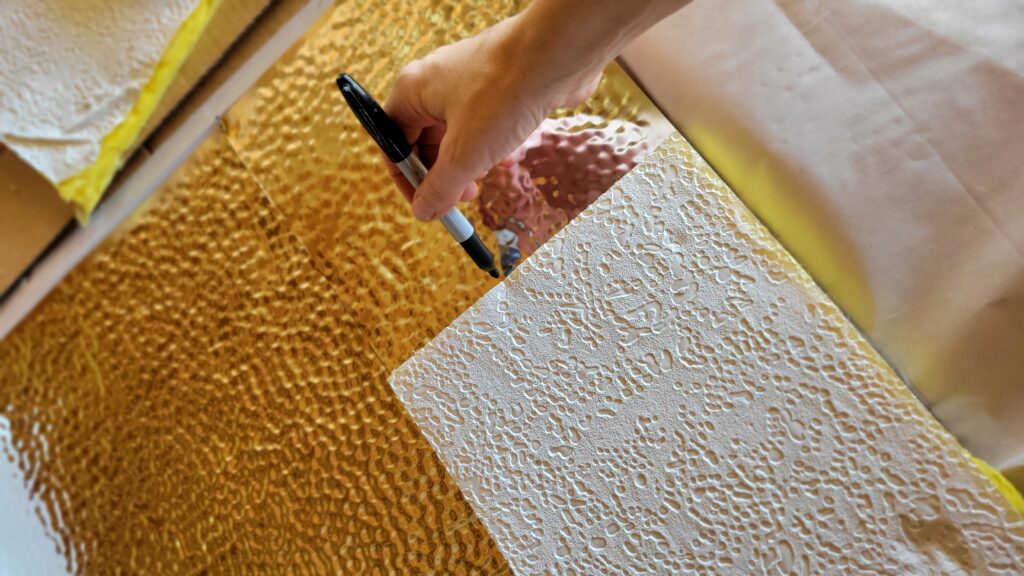
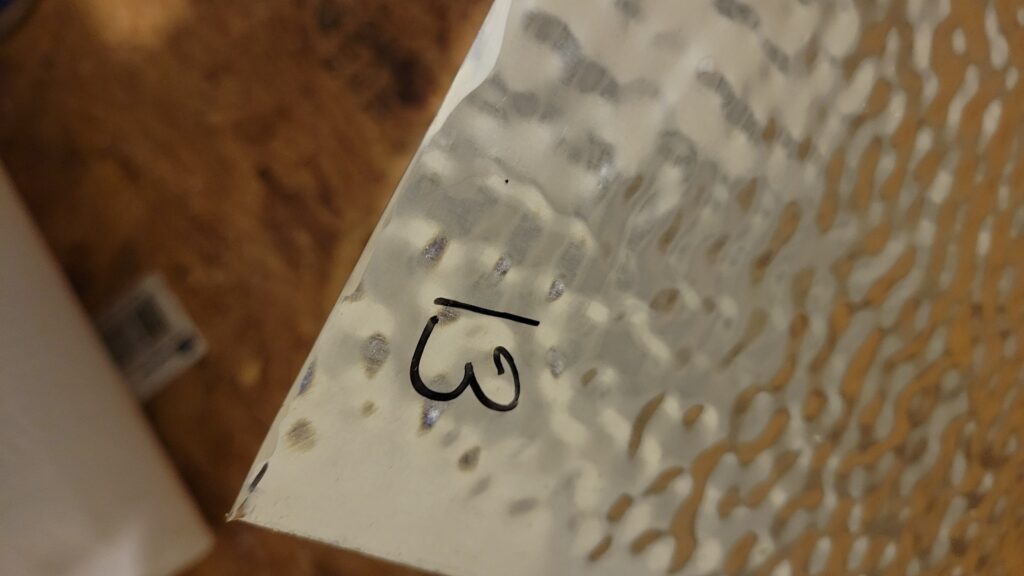
**Another tip that is important– when I took down the filler tile to go paint it— I took it down in order and I numbered the backs in the lower right hand corner as I went clockwise around the room. This made it so very easy to put the tiles back up!
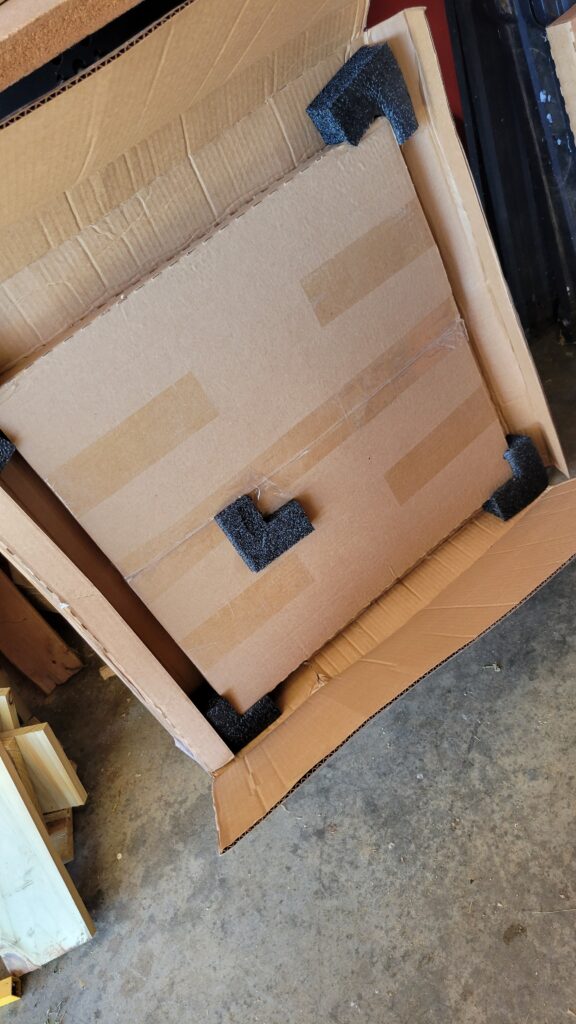
The tiles came very well packaged– a box inside of a box.
So at this point I was partway through painting and sanding the tiles. You can hear in the video that my voice sounds rough. I had what I thought was laryngitis for about 3 weeks. Then I noticed a lump on the outside of my throat and it turned out to be my thyroid. I had been tired for some time (and you can hear that tiredness in my voice, too) but thought it was just from working on the house all the time.
Well, I went downhill energy-wise and couldn’t do a single thing on those tiles, or much of anything else, either. It was rough. Doctor’s appointments, scans, you know the drill. After starting medicine for hyperthyroidism, I began to feel better and was able to work on those tiles again.
[And while we’re talking about my thyroid– I just have to mention that when I went in for my biopsy, the nodules weren’t there anymore! I didn’t even have a biopsy! My whole church and neighbors have prayed for me, and I’m so grateful for answered prayer! “I cried unto him with my mouth… But verily God hath heard me; he hath attended to the voice of my prayer. Blessed be God, which hath not turned away my prayer, nor his mercy from me.” Psalm 66:17-20]
I’m so grateful that the folks at Black Dog Salvage have been so very patient with me to get this project finished!!
But….. by the time I got back to those tiles– that paint had hardened and I had to work so hard to get it off on the high spots! I didn’t know that I should have rubbed it off right away as soon as the paint dried. I did it that way on the last 2, and it was so very easy! Oh well…. such is life.
At least I know how very well the paint adheres– just like it promises.
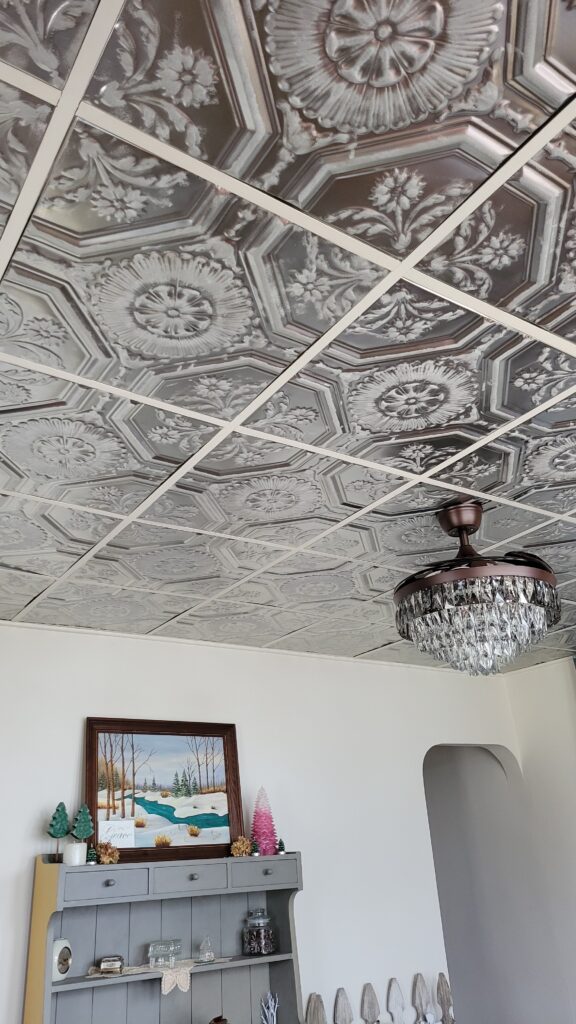
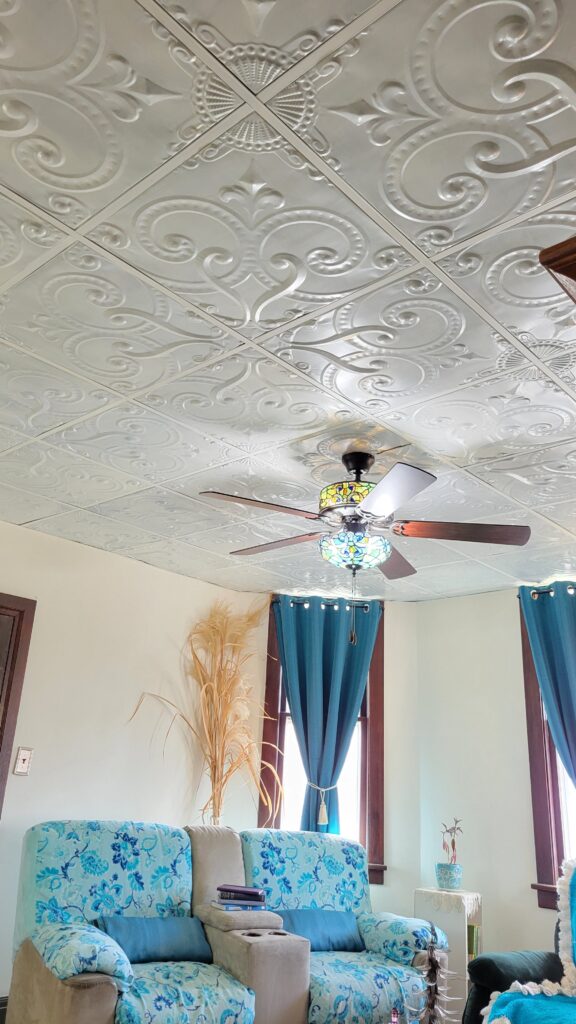
By now you’ve watched the video to see the process…. are you ready to see the finished Ceiling???
Drop Ceiling Tin Tile Reveal

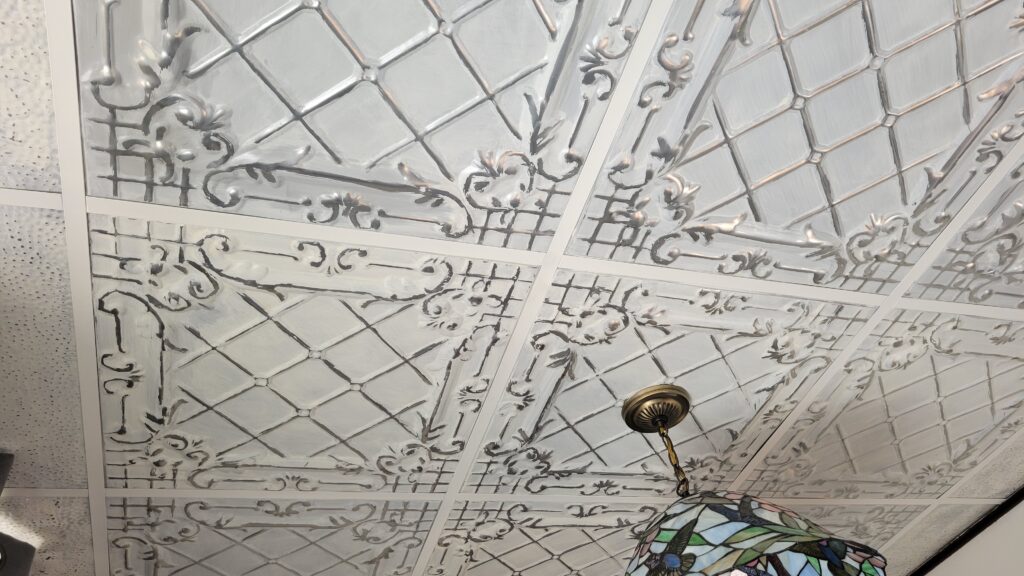
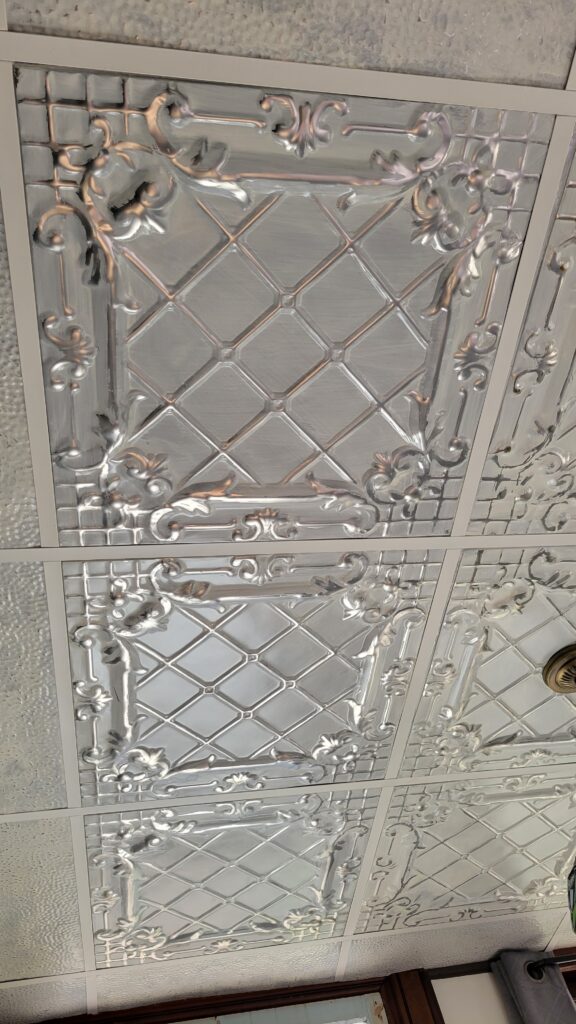
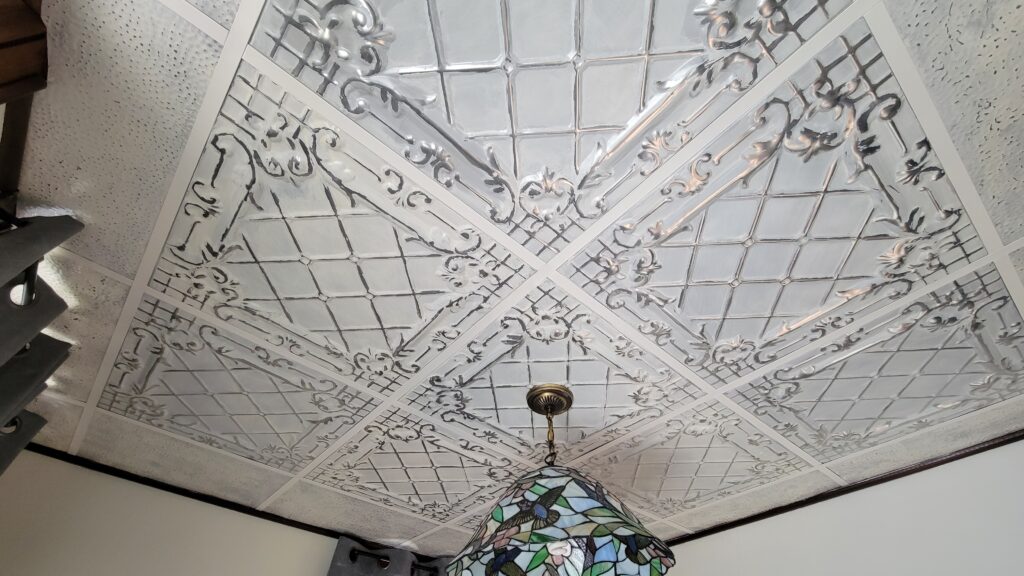
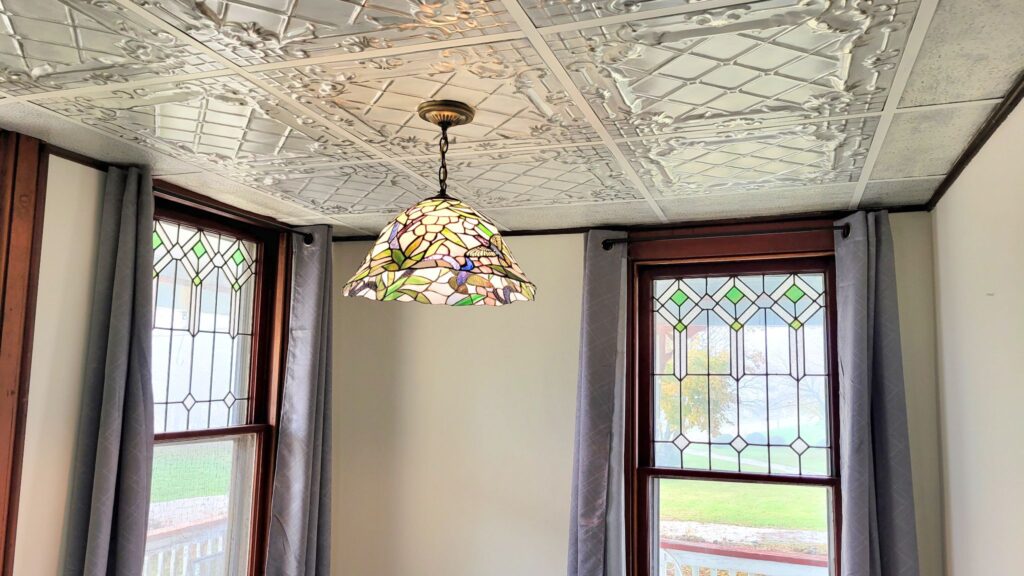
See that smooth satin finish? A gloss would have been way too much shine. Flat would be dull. I absolutely love Show Dog Satin clear coat.
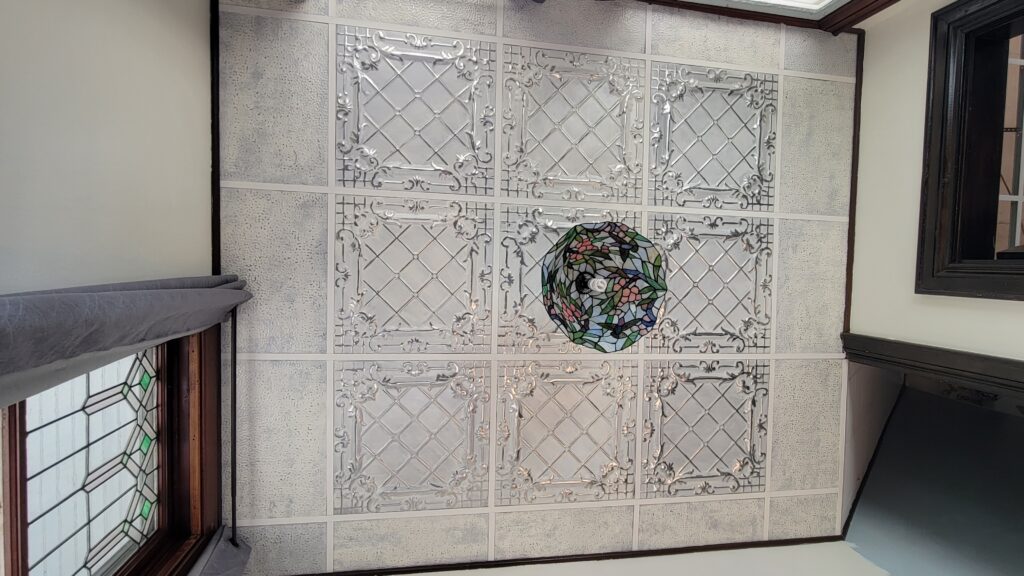
I know my piano students are going to love coming to piano lessons in this gorgeous room!
American Tin Ceilings has a premium Artisan tile that is similar in look to what I did with these tiles. Do you have any idea how much those cost per tile?! It is called Artisan Silver Washed White. They are $40 per 2×2 tile. I saved $32 per square!!!
Saving money is one of my biggest motivations for learning to DIY. It also brings a degree of satisfaction to be able to say, “I made that.”
Now I’m sure you saw that it took me a lot of work to make my own DIY tiles for a drop ceiling. If you have the money, go ahead and take the easy route and purchase them (after looking at samples!)– they are very beautiful tiles. If I had unlimited resources….
But if you’re like me and you want to do 2 more rooms that have 50 tiles each and you don’t want to spend $4,000 plus on your ceilings– then I hope that I have helped you learn how to do these yourself! By doing them myself, I have saved about 1/4 of the cost. And that doesn’t include the cost of installation, so my savings is actually much higher.
[Aren’t drop in ceilings easy to install, you ask? Well, the full panels, yes. But all of those tricky size ones take a good deal of time to cut the templates and then cut the tin. Even if you order finished tiles, there will probably be some trimming and fitting to do.]
[By the way, if you’d like to see this entire room’s renovation, here it is.]

How to Get a 20% Discount on Black Dog Salvage Furniture Paint
- Use code B420 to get 20% off your order for Black Dog Salvage Furniture Paint that is Made in the USA!
- Clean Canvas white
- Dog Bone khaki
- Baby I’m Amaized yellow
- Show Dog satin clear top coat
- Plus many more beautiful colors that are completely mixable!
How to Get American Tin Ceiling Tiles
Go to their website. You can order just one tile to turn it into a lovely piece of art for your home. That sample size you saw above? That is their Backsplash Tile size!! So many possibilities–all made in the USA.
I used the Drop Ceiling version, but they also have Nail Up or Glue Up tiles.
They have a look very similar to what I did– the finish is called “Artisan Silver Washed White.” I actually didn’t realize they had one like that until mine were finished. I just had an idea in my head and worked to make it happen.
I wanted my ceiling to match my ivory walls– I’m not sure if they have “Artisan Silver Washed Ivory.” If they had, and I had the $$$$ I would have had to order a sample to be sure it was the right shade.
If you decide to order anything– do let me know– I’d love to hear about your project!
Other Tools I Used

- I really liked this handheld micro sander for sanding the paint off of the high spots. It comes with 3 different sandpaper– rough, medium, and smooth.
- I used a lint free paint roller to clear coat the backs of the filler tiles.
- This FreeForm angle brush is one of my favorites to use for everything. It’s easy on the wrist!
- My Ryobi detail sander worked well when I could get the paint off by hand. Mine is an older version, but still works great!
- Grippy gardening gloves helped me hold the tiles easily without dropping them, cutting myself, or getting my skin oil on the tiles.
- Purple Whizz Velour paint roller for rolling paint on the flat filler tile.
More Pretty Pictures of a gorgeous drop ceiling
Oh, I could just take pictures all day long! Do you like the room better with the light on or off?


why didn’t you paint the supports for the ceiling? so they would match the tiles?
Hi Susan,
My piano room grid is painted ivory, and the tiles are Ivory and silver. Do you mean my dining room ceiling? My dining room ceiling has Ivory grids to go with the Ivory I painted on the tiles. The tiles were silver gray (without me painting them that way). I think the Ivory grid shows the dining room ceiling tiles off nicely. Not a single person who has seen the ceiling in real life has asked why don’t I paint the grid. To be honest, I think it would be hard to find the exact silver matte color to brush on the grids and match it correctly. And there’s no way I’d want to tape off everything to spray paint them…. I’ve done plenty of work already. 😊
Wow, Liberty, great job! Lots of work but it paid off!
It sure did! I start teaching piano lessons again tomorrow! And we worked on a 2nd ceiling tonight. It is close to being finished. Then on to the 3rd… and we will be taking a break soon to just enjoy our ceilings for awhile. 🙂
What have you been up to?
Wow Liberty this is so pretty.
So happy your thyroid is getting better with medicine.
They’re amazing at Black Dog Salvage.
Well worth the work especially to save that amount of money!
Pinned!
Oh I agree! Thank you Cindy.
This is so impressive! What an affordable way to add wow factor to your room. Great job!
Thank you Rachel!
Wow, beautifully transforming a space is not an easy task. You did it!
Thank you Maria!
Your ceiling looks amazing. I used to live in a house that had these gorgeous ceilings but someone had covered them all up! Great find to renovate them.
Thank you Carol!
OMG!!! What a fantastic idea!!! I LOVE this! The ceiling tiles are simply magnificent!! Gorgeous beyond belief!! I have a drop ceiling in our den so right now , my mind is going around in circles!!! Thanks so much for sharing!!!
Hugs,
Deb
You’re welcome Debbie! I’m so glad you like it! I’d love to know if you decide to do it!
Wow! Such a wonderful transformation! Now the ceiling blends beautifully with your gorgeous windows! It looks like a lot of hard work but I would say it was worth it! Great job!
Thank you so much, Donna!