
Pocket Doors in Basement Wall
Our basement is still unfinished, but we are doing a little bit at a time while we use the space and figure out what to do with it. First, the Downstairs Bathroom was built. A few months ago I finally decided where a wall should go in order to
- help keep the dog contained,
- heat the schoolroom area better, and
- finish off the other side of the stairway closet area.
I wanted pocket doors put in the wall. I have always loved pocket doors, and now if we want to open up the space more, opening the pocket doors will do the trick.
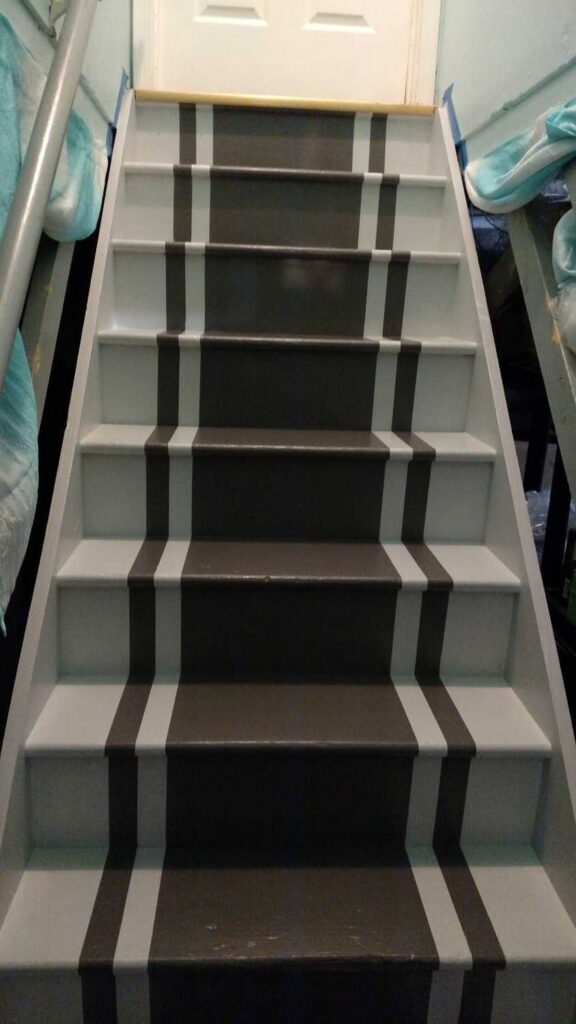
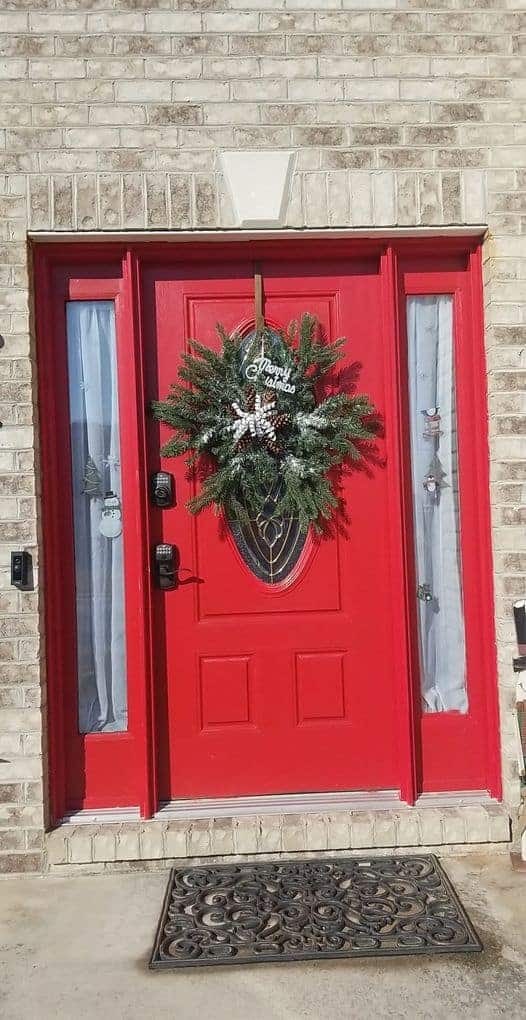
Usually I show you the Before picture first, but this time I want you to see the AFTER, first. Then I will show you the Before. I think you will be amazed at the Before picture….. So here is everything that is done so far….
Wall, AFTER!

[sc name=”This Post May Contain Affiliate Links”]
To the left is our basement stairs going up to the first floor. At the ceiling you can see the duct vent system that runs the length of our basement, straight down the center of the house.
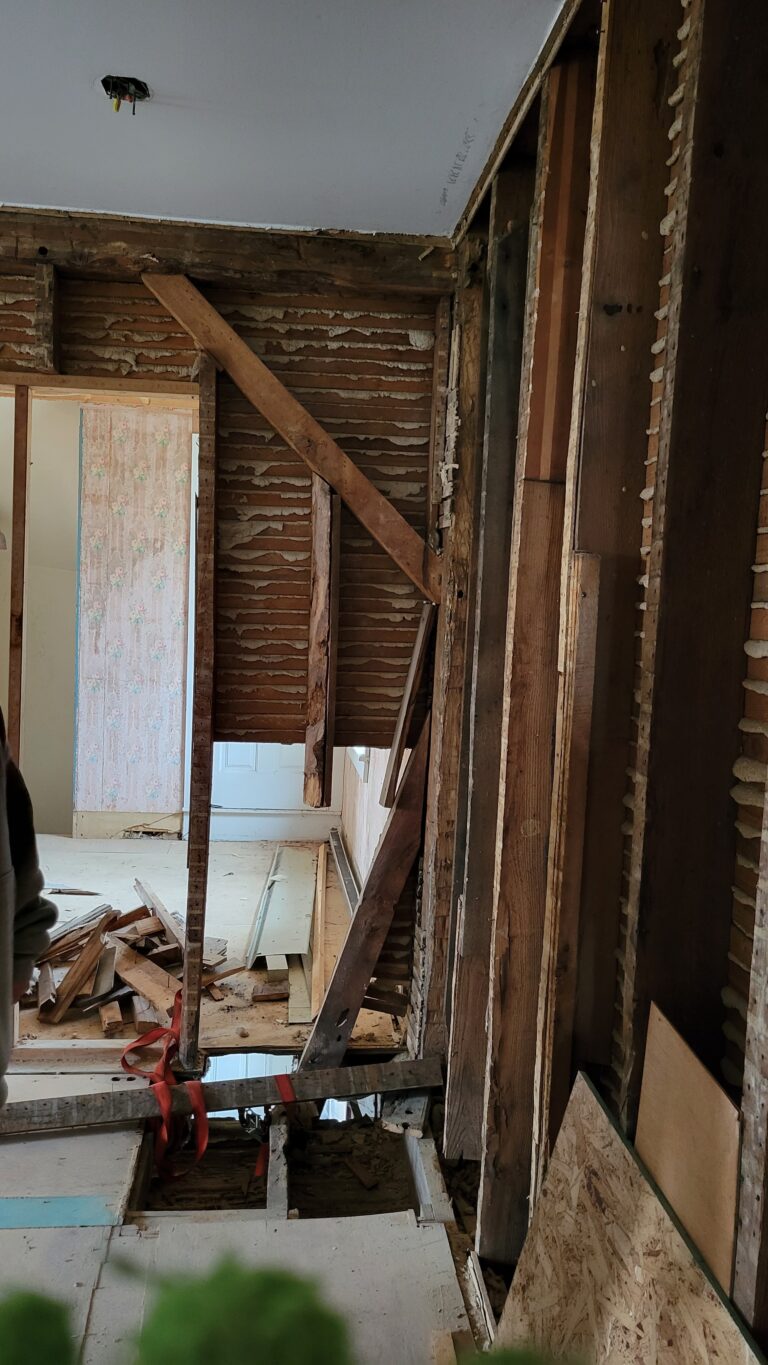
Here are two pictures showing this same space before the wall was put in. If you stand in the right place (in front of the pocket doors), you can see the whole length of the basement.
Before Wall (to the right)

You can see under the stairs where I keep my Christmas decorations. Yikes! See all of the stuff that wall is now hiding!! Before the wall, I hung curtains to hide all of the stuff, for 5 years. It helped, but you can see how much better a wall is! The gray post and two gray railings are already gone and will be replaced with a custom post and rail. (I’ll show them to you in a future post.)
Before Wall (to the left)

Now I want to show you the process, little by little.
Framing
First, metal guides were secured onto the floor where the wall would go.

The framing could have been done all with wood. But our contractor used all metal framing for the bathroom walls, and decided to use part metal with this wall. One more support pole is getting hid inside of a wall and that makes me happy!!

We wanted to keep the stairway open, so the wall is a partial wall and the top angles just like the stairs do. It has a metal piece along the top angled part.


Here is the open part where the pocket doors will go.

Our contractor bought a pocket door kit from our local home improvement store, and followed the instructions to install it. He hung the doors before finishing the wall, to be sure that everything was going to work properly. It also helped us be able to close up the space better if we needed to before the project was finished.
Pocket Doors Open

This view is from the opposite side of the doors, which is now my craft area.
Pocket Doors Closed and Unpainted


Drywall and Mudding
Here is the drywall with the first coat of “mud” on it. Drywall only has the illusion of being flat. Layers of thin “mud” are spread on the seams to smooth them out and blend everything together. It is a very tedious process. You also need patience because it takes about 24 hours for each layer to dry before you can add the next layer.
During Drywall

To the right:

With the doors closed:

*Something I’ve realized through all of this– divide two “messes” and it greatly reduces the illusion of clutter!!
Here is the second and final layer of mud. You can see how wide the seams are now. Our contractor gives us very reasonable rates and allows me to help as much as I can. : ) So I learned how to sand the dried “mud” of the drywall. (I’m also trying to learn how to “mud,” but I need more practice….)

Painting
After I sanded the dried mud, I primed the wall with Zinsser Primer.


Then I painted the wall with the leftover paint I had used on the downstairs bathroom– a very light shade of tinted green.
I highly recommend that if you are installing pocket doors, that you paint them before you hang them. But in our case, they were being installed in late winter/early spring, and the weather outside was not cooperative with painting them. I also did not have a good place indoors to paint something that large, with home schooling the children and the dog coming and going. (We don’t have a garage.)
Well, our contractor was kind enough to come take the pocket doors down so that I could spray paint them outside. I used some large pieces of cardboard to catch the overspray. I put painter’s tape over the hardware, and then used my retractable craft knife to cut away the excess so that the circle shape remained.

I used my Wagner paint sprayer and am so pleased with the results. It is never fun to paint a six panel door with a brush, painting the insets and trying to make it all look right. It is alot of careful brushing and can make your hand sore– especially if you have two doors to do! I had enough cardboard to paint both of my doors one after the other. I waited about twenty minutes before turning them and painting the opposite sides. Then I let them dry for 2 hours before painting both sides again, on both doors. I did not bother with the door edges, since they won’t be seen.
My paint sprayer spit a little bit, so I quickly went over the spit dots before they dried, with a dry brush and they disappeared like magic. I also used a rag to wipe off the sprayer’s nozzle so that it wouldn’t spit from having excess paint on it and that helped. I just followed the instructions that came with my sprayer. I learned to aim the sprayer at my cardboard (because it would spit at the beginning sometimes), get the paint started spraying, and then sweep it over the door.
All in all, I sprayed 4 coats on each of two doors, making 8 total coats. It would have taken so much more time if I had had to brush each side and waited for it to dry 8 times. With this method I only had to wait twice, and the second time I was done! I am so pleased with the results! (and no, this is not a sponsored post but I wish it was!!) The hardest part was cleaning the sprayer, which I did twice.

While the doors were down, I painted the trim on the wall all around the pocket doors on both sides. I knew it would be easiest to paint the trim while the doors were down, so I wouldn’t have to worry about getting paint on the doors.
Hanging Pocket Doors
The hard part was rehanging the pocket doors on the track. I hope I never have to do that again! I knew it was going to be difficult because it took the contractor awhile to get them off so that I could paint them. When I asked about me rehanging them, he was doubtful and didn’t show me how. (I think that’s because there was no easy way to say how to do it!) The trim was very tight to the track, making it extremely difficult to rehang the doors. I saw online where people took off the trim to work on their doors, but my trim had just been installed!
While the wheels were up near the track, I had to attach the wheel assembly to the bracket in the top of the door. After it was attached, then the latch on the bracket needed pushed over/ secured to insure that it would not fall off or out. I used a hanger, a crochet hook, a pipe cleaner, screwdrivers of various sizes, and my cell phone for a flashlight.

I was soooo happy when I finally succeeded in rehanging both of those doors!!! I thought after I hung the first one, that the second one would be easier, but it was just as difficult. My neck was very sore from trying to see what I was doing in the tight space where the track runs. I finally succeeded and kind of by accident used the tight trim as leverage to close the last bracket into place. And I’m very sorry but I have few tips to tell you how to do it! If I had tried to take a video to show you how– well, it would be two hours long and you would see a lot of ways that wouldn’t work. But basically, you try to work in the middle of the doors where the track is open. Then once you secure the wheels onto the bracket, you can actually slide and hang the wheels into the track. But it had to be done in that tight space– I had no room to attach the wheels and then hang the door–everything was just too tight. Believe me, I tried! If there was an easier way, I would have found it.
Here’s another view of the wheel assembly and bracket.


Pocket Doors Painted and Hung

And now we are back to where we began– the After picture! I hope that you have enjoyed this post about my new Wall with Pocket Doors!!
After Wall and Pocket Doors
PS. On my craft room side of the doors, I temporarily set up a bed for some company that I had. It happens to be a canopy bed, so it hides all of my craft room stuff! The bed frame is for sale if you are local. If you are not local, it is this bed on Amazon so you can still get it!

(see the ceiling vent and the pole that is now inside the wall?)


Thank you for sharing at #ThursdayFavoriteThings. Pinned and shared.