
Upstairs Bathroom Renovation (part 2): The Shower


There were two main reasons that we decided to replace the shower surround in our bathroom, soon after we moved into our house. The first reason is that the bottom would move and bend down when my husband stepped on it. He stood on the sides for fear that he would crack the bottom. It wasn’t supported very well.
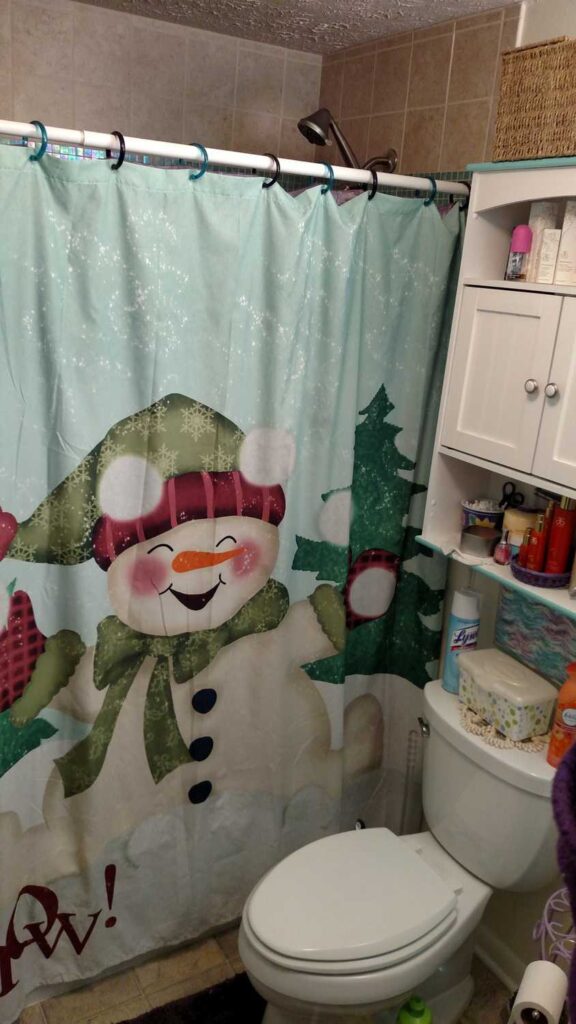
Shower Before
: The Shower https://www.b4andafters.com")
[sc name=”This Post May Contain Affiliate Links”]
The second reason that we wanted to replace the shower surround is that the horizontal seams about 8 inches above the tub were not sealed. I suspected that there was a lot of dirt and grime that I could not get to because every time I cleaned and rinsed the shower, tons of dirt would rinse out of those seams.
: The Shower https://www.b4andafters.com")
There was not a lot of room to set shampoo and body wash and things (as you can see in the first picture, above, we sat some of it up on top of the surround). The shelves that did exist were too short for some of the bottles.
: The Shower https://www.b4andafters.com")
So as I planned and designed our new shower, I knew that I wanted plenty of space to hold shampoo, conditioner, and body wash. It was our only bathroom at the time, so it needed to hold everyone’s toiletries. We had a Tile Shop near us, where I found out about plastic tile insert boxes.* This is a picture of one at the Tile Shop, where they left it partially untiled on purpose so that you could see how easy it was to install.
: The Shower https://www.b4andafters.com")
After a long hunt, I found the accent tile that I wanted to use at local tile shop 40 minutes away called Tileology. I had been looking for a specific aqua green that would go with my shower curtain and my accent wall. I was so glad that the price was reasonable for the amount of tile that I needed.
: The Shower https://www.b4andafters.com")
: The Shower https://www.b4andafters.com")
The tile came adhered to a clear plastic film.
: The Shower https://www.b4andafters.com")
I wanted a glossy white tile from Lowe’s for my main tiles. I chose 6 inch squares, but if I were to have a shower tiled again I would use a much larger size.
As I laid out the tile to plan my design, I noticed that the white tiles were flawed. They had tiny bumps in the surface, sporadically here and there. I sorted through the boxes, looking for good tiles, and found very few good ones that passed my “quality inspection.” I traveled to all of the Lowe’s within driving distance from me, and could not find enough good tiles. I think that I even contacted the manufacturer, and was told that that was just the way those tiles were. In the end I went to a different store and chose a marbled sandy color. That was the color that my husband had preferred. The sandy colored tiles were not glossy, and did not have any bumps in them.
: The Shower https://www.b4andafters.com")
As the contractor worked on the bathroom, I snuck in to take pictures of the progress. Here the plastic wall surround has been taken off, exposing that horizontal seam.
: The Shower https://www.b4andafters.com")
It was just as I had suspected— grimy and very gross!! This is what had been hiding in that unsealed seam that I was unable to clean! Yuck! No wonder dirt kept washing out no matter how much I rinsed it.
: The Shower https://www.b4andafters.com")
My husband chose a jet tub to go with the tiled shower. We had a new toilet put in and saved our old toilet for our then future downstairs bathroom. We had also contracted to have my salvaged vanity, and new flooring (leftover from the kitchen) put in all at the same time. In the picture below you can can see the old dark blue color of the bathroom that was behind the toilet tank, the unpainted wall where the old vanity was in the corner, and my new accent aqua green wall.
: The Shower https://www.b4andafters.com")
The renovation was supposed to take a week. It ended up taking a month. That was tough when it was the only bathroom we had. But we survived, due to relatives and an accommodating neighbor.
: The Shower https://www.b4andafters.com")
Here you can see the shower shelf boxes* installed. The pipe for the shower head was routed around the blue tile box to the right.
: The Shower https://www.b4andafters.com")
This is a special kind of drywall called cement board that is meant to resist moisture in showers and bathrooms.
: The Shower https://www.b4andafters.com")
Here it is patched up, looking toward the shower head.
: The Shower https://www.b4andafters.com")
Here is the tile being put up, little by little.
: The Shower https://www.b4andafters.com")
And some more tile….
: The Shower https://www.b4andafters.com")
These are boards being used as placeholders for the accent tile.
: The Shower https://www.b4andafters.com")
Here are the glass shelves being tiled into the shelf boxes.
: The Shower https://www.b4andafters.com")
We chose premixed grout by Fusion Pro. Just open the bucket and put it on.
: The Shower https://www.b4andafters.com")
Let me stop here and tell you what I’ve learned about choosing contractors…. For this particular job, we found someone who was a jack-of-all-trades who did the job for at least half of what someone else would have charged us. I am usually content with the quality of work of the people we hire to do work…. this was too big of a job for me to tackle on my own for sure! But see the big gap in the tile above the box below? That huge gap worried me. After it was filled with grout it looked much better— but let me tell you– those tiles adhered to the top of the tile boxes? Our contractor left for the day, and those tiles started falling off!! Oh!! They should have been propped into position until they dried. This is just one example of things I caught all along the way— and it was very nerve wracking.
: The Shower https://www.b4andafters.com")
I will tell you two more things: I found out barely in time that glass tile should have a different adhesive for it than regular tile– it needs “Glass Tile Adhesive” that is a lighter color so that the true color of the glass will show. I am Sooooo glad that I found it out in time, because my contractor didn’t know about it since he was not a professional tiler.
The other thing is: after everything was done, our contractor turned on the jet tub and came to find me and show me how great everything was. When we came to look at it– water was going all over the tile because a jet was pointed up. It hadn’t been doing that when he left—- and the grout hadn’t cured yet. BOY was I frustrated!!!
I’m telling you this because this is the one time that I wished I had paid a ton of extra money for a bonafide professional. The stress of the job taking four times longer than it was supposed to, combined with having to worry about quality along the way, was just not worth the money that we saved.
Before grout:
: The Shower https://www.b4andafters.com")
That gap is looking so much better now, isn’t it?!
: The Shower https://www.b4andafters.com")
I hope you have enjoyed seeing how our shower got tiled. I enjoyed planning its design and am so happy with how it all turned out. To see the rest of the Upstairs Bathroom makeover, click HERE. To see how I used the leftover tiles to make my own Removable Backsplash, click HERE. And to see where I built a shelf to go over my bathroom door, click HERE. I still have a few tiles left that I hope to incorporate into a clock one day— if you know exactly HOW, please let me know!!
Shower Before
: The Shower https://www.b4andafters.com")
Isn’t it a lovely difference?! I LOVE Before and Afters! (of course I do! : ) ) You can see in the picture below where I freehand painted the accent color on some of the cabinet trim. It was in need of painting so I used the accent color.
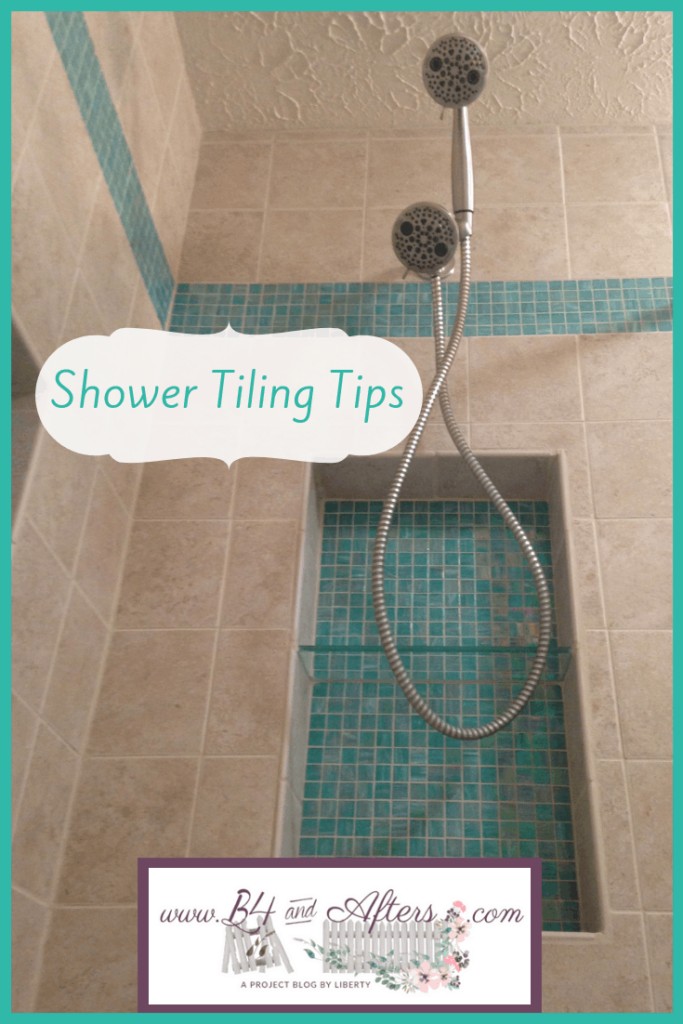
Shower AFTER!!
: The Shower https://www.b4andafters.com")
: The Shower https://www.b4andafters.com")
: The Shower https://www.b4andafters.com")


Lots to do but all of it were worth the effort! Joint fun and happy memories making renovations with family. Such a blessed time to be in from anticipation to awesomeness!
I agree, thank you!
Wow! Stunning transformation with your bathroom makeover! I love the tile and the extra storage you added.
Have a great week,
Kippi
Thank you, Kippi!
Liberty,
Thanks so much for stopping by and for taking the time to comment!!! This looks amazing!! Love your color choices!! I would love to re-do our upstairs bathroom but instead, we might be moving to an apartment and downsizing within the next few years and as retirees, i am not sure I want to put the money into it…
Thanks for sharing!!
Hugs,
Deb
I understand– that’s one thing about our small house— we won’t have to downsize! We have saved ourselves a step or two.
Thank you for sharing at #ThursdayFavoriteThings. Pinned and shared.
I LOVE the turquoise accent tile. The finished project looks great!
Thank you, Donna!
Wow, what a difference! Your bathroom looks great. I have a similar glass tile, but mine is copper colored. We’ve had some great contractors, and some awful ones. The bad experiences were definitely the jack of all trades guys, which unfortunately we used in our master bath. A bathroom designer/contractor handled the next two bathrooms, and was professional all the way. Live and learn!
Well, for our downstairs bathroom we found a much better jack of all trades– who is more like a Master of all Trades! But I do agree that usually a jack of all trades is not skillful. Then again….I like to do a lot of different things– I’d like to think that I was an expert in some of them….
Thank you for sharing at #OverTheMoon. Pinned and shared.
Liberty what a difference in your shower/tub area. So much nicer on the eye. Thanks again for linking up with our Celebrate Your Story Link Party.
You’re welcome, Kari!
Hi Liberty,
The remodel is beautiful – and I love that aqua tile! I wish I had known about the glass tile adhesive for our remodel. Enjoy the new bathroom. 🙂
Thank you, Neena!
What a nice update for your bathroom! The tile looks great and the hassle you went through was worth it to get these nice end results.
Thank you, Paula!